Category: Education

  • Primary vs Secondary Sources in Academic Research

    Primary vs Secondary Sources in Academic Research

    Understanding primary vs secondary sources in research is an essential skill for university students, researchers, and academic writers. Whether you are preparing an essay, writing a literature review, or completing a research project, knowing how to distinguish between primary and secondary sources helps you select reliable evidence and build stronger academic arguments.

    Primary sources provide original evidence, data, or material, while secondary sources analyze, interpret, or synthesize existing evidence. Both types are important in academic research, but each serves a different purpose.

    What Is the Difference Between Primary and Secondary Sources in Research?

    The main difference between primary and secondary sources in research is how each source relates to the original evidence.

    A primary source provides original material, such as research data, interviews, historical documents, or experimental results. A secondary source examines existing material to explain findings, compare interpretations, or identify broader patterns.

    For example, an original scientific experiment is generally a primary source, while a review article comparing several experiments is usually a secondary source. Understanding this distinction helps students select the appropriate evidence for their research questions.

    Examples of Primary and Secondary Sources in Research

    Common primary sources include original research articles, interviews, survey results, historical letters, government records, and experimental data.

    Secondary sources include literature reviews, systematic reviews, scholarly analyses, biographies, and academic books that interpret existing evidence.

    The classification depends on the research question. A newspaper article, for instance, may be a primary source when studying public reaction at the time of an event, but a secondary source when it provides a later interpretation of that event.

    How to Identify Primary vs. Secondary Sources in Research

    To determine whether a source is primary or secondary, follow these steps:

    1. Define your research question. Identify the specific issue or topic you want to investigate.
    2. Examine the source’s purpose. Determine whether it presents original evidence or interprets existing information.
    3. Review the methods and evidence. Look for original data collection, experiments, interviews, or analysis of previous studies.
    4. Check the references. See whether the source relies on earlier research or presents new findings.
    5. Consider how you will use it. A source’s role in your particular research project helps determine its classification.

    These steps make it easier to understand primary vs secondary sources in research and choose evidence that supports your academic argument.

    Why Primary and Secondary Sources Matter in Academic Research

    Using both types of sources can strengthen a research paper. Primary sources provide direct evidence for analysis, while secondary sources help explain how that evidence relates to previous scholarship.

    For example, a student studying online education might analyze original survey responses as primary evidence and use a scholarly literature review to compare those results with earlier studies.

    When choosing sources, consider their credibility, relevance, research methods, and limitations. Neither primary nor secondary sources are automatically reliable simply because of their category.

    Frequently Asked Questions

    What is the main difference between primary and secondary sources?

    Primary sources provide original evidence or material. Secondary sources analyze, interpret, or synthesize existing evidence.

    Why are primary and secondary sources important in research?

    They help researchers examine original evidence, understand existing scholarship, compare interpretations, and develop well-supported conclusions.

    Can a journal article be a primary source?

    Yes. An article reporting original experiments, interviews, surveys, or observations is generally a primary source. A literature review or meta-analysis is generally a secondary source.

    How do I choose the right source for my assignment?

    Start with your research question, evaluate the source’s purpose and credibility, and check your instructor’s requirements. Many academic projects benefit from using both primary and secondary sources.

  • How to Read Scientific Research Papers Efficiently

    How to Read Scientific Research Papers Efficiently

    Scientific research papers contain valuable information, but understanding them can be challenging, especially for students who are new to academic research. Dense terminology, complex statistics, detailed methods, and lengthy discussions can make even a short paper feel overwhelming.

    Learning how to read scientific research papers efficiently can help you understand research findings, evaluate evidence, prepare literature reviews, and make better academic decisions. The key is not to read every paper from beginning to end at the same speed. Instead, use a structured approach that helps you identify the main question, examine the evidence, and decide which details deserve closer attention.

    This guide explains a practical method for reading scientific papers, understanding their structure, evaluating their findings, and taking useful notes without wasting time.

    Why Is Reading Scientific Research Papers Difficult?

    Scientific papers are written for readers who may already understand the topic, research methods, and technical vocabulary. As a result, authors often present information more formally and precisely than general educational articles.

    Students commonly experience several difficulties:

    • Unfamiliar terminology: Specialized words can make paragraphs difficult to understand.
    • Complex research methods: Experiments, sampling procedures, and statistical analyses may require additional background knowledge.
    • Information overload: A paper may contain extensive details that are not equally important to every reader.
    • Confusing results: Statistical significance does not always mean a finding is important in practical terms.
    • Limited time: Students may need to review many papers for assignments, dissertations, or literature reviews.

    The solution is to read with a clear purpose. Before opening a paper, decide what you need to learn from it and how closely you need to examine its evidence.

    How to Read Scientific Research Papers: A Step-by-Step Method

    Step 1: Identify Your Research Question

    Begin by defining what you want to find out. Your purpose might be to understand a scientific concept, compare different studies, evaluate a research method, or locate evidence for an academic argument.

    For example, a student researching the relationship between sleep and academic performance might ask:

    • Does the study examine sleep duration, sleep quality, or both?
    • Which group of students participated?
    • How did the researchers measure academic performance?
    • What conclusions did the evidence support?

    A clear question helps you distinguish relevant information from details that do not contribute to your research goal.

    Step 2: Check the Title, Abstract, and Keywords

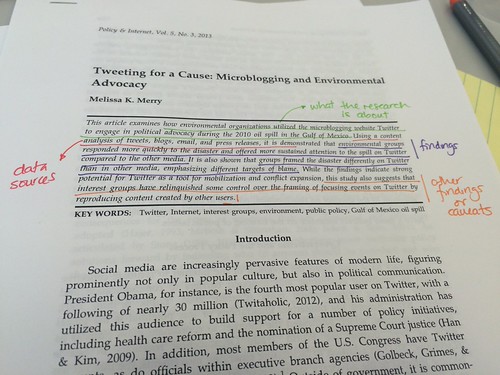
    The title gives you an initial idea of the paper’s subject. The abstract usually summarizes the research question, methods, main findings, and conclusions. Keywords identify important concepts associated with the study.

    Read these sections first to decide whether the paper is relevant to your needs.

    As you read the abstract, look for four elements:

    1. Purpose: What problem or question did the researchers investigate?
    2. Methods: How was the study conducted?
    3. Results: What were the main findings?
    4. Conclusion: What do the authors believe the findings mean?

    Do not treat the abstract as a complete account of the research. It provides an overview, but you should examine the full paper before relying on its conclusions.

    Step 3: Read the Introduction to Understand the Context

    The introduction explains the background of the research and identifies the problem the study aims to address. It may summarize previous research, describe gaps in existing knowledge, and present the research question or hypothesis.

    You do not need to memorize every citation in the introduction during your first reading. Focus instead on understanding why the study was conducted.

    Ask yourself:

    • What is already known about this topic?
    • What remains uncertain?
    • Why does the research question matter?
    • What hypothesis or objective guides the study?

    Understanding the research context makes the methods and results easier to interpret later.

    Step 4: Examine the Figures, Tables, and Results

    Figures and tables often communicate the most important findings more clearly than long paragraphs. Reviewing them early can help you understand what the researchers discovered before studying every technical detail.

    For each figure or table, check:

    • The title and caption.
    • The variables being measured.
    • The number and characteristics of participants or observations.
    • The units, axes, and comparison groups.
    • The pattern shown by the data.
    • Any uncertainty measures, such as confidence intervals or error bars.

    Next, read the results section to understand how the authors describe their findings. Separate what the data directly show from what the authors suggest those findings might mean.

    Remember that a statistically significant result is not automatically large, practically important, or evidence of causation. Interpretation depends on the study design, effect size, uncertainty, and research context.

    Step 5: Review the Methods Section

    The methods section explains how the research was conducted. Although it can be technical, it is essential for deciding whether the findings are trustworthy and relevant.

    You may not need to understand every procedural detail during an initial review. However, you should identify the elements that affect the reliability of the evidence.

    Pay attention to:

    • Study design: Was the research experimental, observational, qualitative, or based on another approach?
    • Sample: How many participants or observations were included, and how were they selected?
    • Measurements: Were the main variables measured in a clear and appropriate way?
    • Analysis: Did the researchers use methods suited to their data and research question?
    • Limitations: Could bias, missing data, confounding factors, or a small sample affect the results?

    For example, an observational study may identify an association between two variables without proving that one causes the other. Understanding the design helps prevent you from making claims that go beyond the evidence.

    Step 6: Read the Discussion and Conclusion Critically

    The discussion explains how the authors interpret their results, how those results compare with previous research, and what limitations may affect their conclusions.

    Compare the discussion with the results section. Ask whether the authors’ claims are supported by the data or whether some statements go beyond what the study can establish.

    Look for three things:

    • Interpretation: How do the researchers explain their findings?
    • Limitations: What weaknesses or uncertainties do they acknowledge?
    • Implications: What do the findings mean for future research or practical decisions?

    The conclusion should summarize the study’s main contribution, but it should not replace your own evaluation of the evidence.

    Step 7: Return to Difficult Sections

    After your first pass, revisit the sections that matter most to your research question. This is the time to examine unfamiliar terminology, statistical tests, methodological choices, or individual results more carefully.

    Use a scientific dictionary, a relevant textbook, or reliable educational material to clarify concepts you do not understand. When interpreting a statistical result, make sure you understand what the reported measure represents rather than relying on a single number.

    You do not need to master every detail of every paper. Focus your deeper reading on information that affects your interpretation or helps answer your research question.

    Understand the Structure of a Scientific Research Paper

    Many original research papers follow the IMRaD structure: Introduction, Methods, Results, and Discussion. Other papers, including systematic reviews and theoretical articles, may use different structures.

    SectionMain purposeWhat to look for
    AbstractSummarizes the studyResearch question, methods, findings
    IntroductionEstablishes contextBackground, research gap, objective
    MethodsDescribes the research processDesign, sample, measurements, analysis
    ResultsReports the findingsData patterns, comparisons, statistical results
    DiscussionInterprets the findingsMeaning, limitations, relationship to prior work
    ConclusionSummarizes the contributionMain takeaway and implications
    ReferencesLists cited worksEarlier research and sources for follow-up reading

    Understanding this structure helps you navigate a paper instead of treating it as one long block of text.

    How to Evaluate the Quality of a Research Paper

    Reading efficiently does not mean accepting every published claim. A useful reading strategy includes evaluating the quality and relevance of the evidence.

    Check the Research Design

    Determine whether the design can answer the research question. A controlled experiment may provide stronger evidence for a causal relationship than an observational study, although the strength of evidence still depends on how the research was conducted.

    Consider the Sample

    Check the size and characteristics of the sample. A study involving a small, narrowly defined group may not apply to a much larger or different population.

    Look for Possible Bias

    Consider how participants were selected, how measurements were collected, whether relevant comparison groups were used, and whether conflicts of interest were disclosed. These factors can influence how confidently the findings should be interpreted.

    Distinguish Results From Claims

    Identify the difference between what researchers measured and what they inferred. Be especially careful when authors or headlines suggest that one factor causes another when the study only establishes an association.

    Consider the Limitations

    Every research design has limitations. A well-reported study usually explains important sources of uncertainty. Limitations do not automatically make a study useless, but they help define how its findings should be applied.

    Effective Note-Taking Strategies for Research Papers

    Taking concise notes helps you remember what you read and compare studies later. Instead of highlighting entire paragraphs, record information that answers your research question.

    A simple research note template can include:

    • Citation details: Record the authors, publication year, title, and journal so you can identify the paper later.
    • Research question: Summarize the problem the study investigates.
    • Study design and sample: Note how the researchers collected their evidence.
    • Main findings: Write down the most relevant results in your own words.
    • Limitations: Record weaknesses or uncertainties that affect interpretation.
    • Relevance: Explain how the paper relates to your project.
    • Follow-up questions: List terms, methods, or claims that need further investigation.

    Clearly distinguish your own interpretations from the authors’ statements. When recording an exact quotation, mark it as a quotation and preserve enough information to locate it again. This reduces the risk of accidental plagiarism when you write your own paper.

    Common Mistakes to Avoid When Reading Scientific Papers

    Even experienced students can waste time or misinterpret research if they rely on ineffective habits.

    Reading every word before deciding whether the paper is relevant. Start with the title and abstract, then examine the sections most closely connected to your question.

    Relying only on the abstract. Abstracts provide summaries, but they may not include enough detail to assess methods, limitations, or the full context of the results.

    Skipping the methods section entirely. Without understanding how the study was conducted, it is difficult to judge the strength of its findings.

    Highlighting too much text. Highlighting entire pages does little to identify the most important information. Write short summaries and specific questions instead.

    Treating correlation as causation. Two variables may be associated for several reasons. The study design determines which interpretations are justified.

    Ignoring contradictory evidence. One paper rarely settles an entire scientific question. Compare findings across relevant studies and consider differences in their methods and populations.

    Accepting conclusions without checking the data. Compare the authors’ interpretation with the results and limitations before using the paper to support an argument.

    A Practical Checklist for Reading Scientific Research Papers

    Use this checklist when reviewing a paper for a class assignment, research project, or literature review.

    • I can explain the main research question.
    • I understand why the study was conducted.
    • I have identified the research design and sample.
    • I have reviewed the most relevant figures and tables.
    • I can summarize the main findings in my own words.
    • I have considered the study’s limitations.
    • I can distinguish the results from the authors’ interpretation.
    • I have recorded useful notes and citation details.
    • I know how the paper relates to my research question.
    • I have identified any claims that need to be checked against other studies.

    If you cannot answer several of these questions, return to the relevant sections before using the paper as evidence in your work.

    Frequently Asked Questions

    What is the fastest way to read a scientific research paper?

    Start with the title, abstract, and research question. Review the main figures and tables, then examine the results, methods, discussion, and conclusion according to your needs. Read technical sections in greater depth when they affect your understanding of the evidence.

    Should I read a research paper from beginning to end?

    Not necessarily. A structured first pass helps you determine whether the paper is relevant. You can then read selected sections more closely. However, if you plan to cite the study or evaluate its conclusions, review enough of the methods, results, and limitations to understand the evidence properly.

    How can I understand a scientific paper if I do not know the terminology?

    Write down unfamiliar terms and look up their meanings in reliable educational or scientific references. Read the surrounding paragraph for context and return to the term after understanding the research question. Avoid guessing the meaning of technical terms based only on everyday usage.

    How many times should I read a scientific research paper?

    The number of readings depends on your purpose and the paper’s complexity. An initial scan may be enough to decide whether a paper is relevant. A second, more focused reading can help you understand the methods and findings. A third review may be useful when evaluating detailed evidence or preparing a literature review.

    How do I know whether a research paper is reliable?

    Consider the study design, sample, measurement methods, analysis, limitations, transparency, and relevance to your question. Also compare the findings with other credible research. Publication alone does not guarantee that every conclusion is correct.

    What should I write in my notes after reading a research paper?

    Record the research question, design, sample, main findings, limitations, and relevance to your project. Include the citation details and any questions that require follow-up. Summarize the ideas in your own words while clearly marking direct quotations.

    Conclusion

    Learning how to read scientific research papers efficiently is a valuable academic skill that improves with practice. Instead of reading every paper in the same way, begin with a clear question, scan the abstract, understand the study’s context, examine its data, and review the methods and limitations before accepting its conclusions.

    Use concise notes to preserve important findings and compare evidence across studies. Most importantly, distinguish what researchers actually demonstrated from what they believe their findings might mean. This approach helps you save time while developing a more accurate and critical understanding of scientific evidence.

    With a consistent reading process, scientific papers become easier to navigate, and the information they contain becomes more useful for assignments, literature reviews, dissertations, and independent research.

  • How to Write a Compare-and-Contrast Essay

    How to Write a Compare-and-Contrast Essay

    A compare-and-contrast essay helps students explore the similarities and differences between two subjects, ideas, texts, events, or experiences. It is a common university assignment because it develops critical thinking, analytical reasoning, and the ability to organize evidence into a clear argument. However, simply listing similarities and differences is not enough. A strong essay explains why those comparisons matter and what readers can learn from them.

    If you want to understand how to write a compare and contrast essay, start by choosing two subjects that have meaningful similarities and differences. Then identify clear comparison points, develop a focused thesis statement, organize your paragraphs logically, and support your analysis with relevant evidence.

    This guide explains each stage of the writing process, from selecting a topic to proofreading your final draft. It also includes examples, essay structures, common mistakes, and a practical checklist to help you write a more effective academic essay.

    What Is a Compare-and-Contrast Essay?

    A compare-and-contrast essay is an academic paper that examines two or more subjects to explain how they are alike and how they differ. The purpose is not simply to describe each subject separately. Instead, the essay uses comparison to develop a central point, answer a question, or help readers understand a topic more clearly.

    For example, a student might compare online learning with traditional classroom learning. The essay could examine flexibility, student interaction, access to resources, and learning environments. Rather than declaring one approach better without evidence, the writer would explain the strengths and limitations of each based on specific criteria.

    Compare-and-contrast essays may focus on:

    • Two literary works or characters.
    • Different historical events or political systems.
    • Competing scientific theories.
    • Online and face-to-face education.
    • Two technologies or business strategies.
    • Different approaches to solving the same problem.

    The best comparisons involve subjects that share enough in common to make meaningful analysis possible while offering important differences worth exploring.

    How to Write a Compare and Contrast Essay Step by Step

    Step 1: Understand the Assignment

    Before selecting your subjects, read the assignment instructions carefully. Identify which subjects you must compare, how many words you need to write, and whether your instructor expects a balanced comparison or an argument supporting one approach over another.

    Look for instruction words such as compare, contrast, analyze, evaluate, and discuss. These words indicate what your essay needs to accomplish.

    For example, an assignment asking you to compare two leadership styles may require you to explain their similarities and differences. An assignment asking you to evaluate which style is more effective also requires you to establish criteria and support a judgment.

    Understanding the task at the beginning prevents you from writing an informative essay that does not answer the actual question.

    Step 2: Choose Two Suitable Subjects

    Select subjects that have a clear relationship and can be compared using meaningful criteria. If the subjects are too different, you may struggle to develop a focused argument. If they are almost identical, you may have little substantial analysis to present.

    Consider the following questions:

    • Do the subjects share a relevant feature or purpose?
    • Are there meaningful similarities and differences?
    • Can I find reliable information or evidence about both?
    • Is the comparison appropriate for the assignment?
    • Can I explain why the comparison matters?

    For example, comparing two learning methods is usually more productive when you examine the same educational goal, such as student engagement or access to instruction. Comparing unrelated subjects without a clear reason can make an essay feel disorganized.

    Choose a comparison that allows you to investigate a specific question rather than merely describe two topics.

    Step 3: Identify the Main Comparison Points

    Once you have selected your subjects, decide which features you will examine. These features are your comparison points, and they provide the structure for your essay.

    For an essay comparing online learning with traditional classroom learning, possible points include:

    • Flexibility and scheduling.
    • Interaction between students and instructors.
    • Access to learning materials.
    • Opportunities for independent study.
    • Technology requirements.
    • Assessment and feedback.

    Use the same criteria for both subjects. This makes the comparison fairer and helps readers understand the relationship between them.

    Avoid including every possible difference. Select the points that best answer the assignment question and provide enough depth for analysis.

    Step 4: Research Both Subjects

    A strong compare-and-contrast essay relies on relevant evidence rather than unsupported assumptions. Depending on your topic, you may need academic books, scholarly articles, course readings, credible reports, primary documents, or examples from the texts you are studying.

    As you research, record information about both subjects under the same comparison points. This makes it easier to identify patterns and contradictions.

    A comparison table can help organize your notes:

    Comparison pointOnline learningTraditional classroom learning
    SchedulingOften offers greater flexibilityUsually follows a fixed timetable
    InteractionMay rely on video calls, forums, and messagesOften allows direct, in-person discussion
    Learning environmentRequires suitable technology and internet accessUsually requires access to a physical classroom
    Independent studyMay require substantial self-managementMay provide more scheduled structure

    These are general examples, not universal conclusions. Actual experiences depend on course design, teaching quality, student needs, and available resources.

    Use your research to explain similarities and differences accurately, and cite sources according to the referencing style required by your institution.

    Step 5: Develop a Clear Thesis Statement

    Your thesis statement communicates the main point of the essay. It should identify the subjects being compared and indicate the most important insight your analysis will establish.

    A weak thesis simply announces the topic:

    “Online learning and traditional classroom learning have similarities and differences.”

    This statement does not explain which similarities and differences matter or what the essay will argue.

    A stronger thesis might be:

    “Although online and traditional classroom learning can provide access to structured instruction, they differ in scheduling flexibility, forms of interaction, and the level of independent planning students may need.”

    This thesis establishes the main comparison points and gives the essay a clear direction.

    Your thesis should reflect the evidence you have gathered. Avoid making an absolute judgment before you have considered the strengths, limitations, and context of both subjects.

    Step 6: Choose an Essay Structure

    Two common structures work well for compare-and-contrast essays: the block method and the point-by-point method. The best choice depends on the complexity of your topic, the number of comparison points, and your assignment requirements.

    The block method

    Discuss the first subject in one section and the second subject in another. You can then include a paragraph that brings the comparison together, depending on the assignment.

    A simplified structure looks like this:

    1. Introduction and thesis statement.
    2. Body section discussing Subject A.
    3. Body section discussing Subject B.
    4. Direct comparison or synthesis, if needed.
    5. Conclusion.

    This method can work well when each subject requires substantial background explanation. However, readers may need to remember details from an earlier section while reading the later one.

    The point-by-point method

    Discuss both subjects under each comparison point. For example, one paragraph may compare scheduling, another may compare interaction, and a third may examine access to resources.

    A simplified structure looks like this:

    1. Introduction and thesis statement.
    2. Paragraph comparing scheduling.
    3. Paragraph comparing interaction.
    4. Paragraph comparing resources and access.
    5. Conclusion.

    This approach makes similarities and differences easier to follow because readers can compare both subjects within the same section.

    Whichever method you choose, organize your paragraphs around your thesis rather than treating each subject as a separate topic with no clear connection.

    Step 7: Write the Introduction

    Your introduction should establish the topic, introduce the subjects, explain the purpose of the comparison, and present your thesis statement.

    Begin with a relevant opening that provides context. You might introduce a current academic debate, describe a practical problem, or explain why the subjects are commonly compared.

    Next, identify both subjects clearly. Avoid spending too much space explaining background information that does not help the comparison.

    End the introduction with your thesis statement so readers know which aspects the essay will examine and what central point it will develop.

    A focused introduction prepares readers for the analysis without revealing every detail of the body paragraphs.

    Step 8: Develop Focused Body Paragraphs

    Each body paragraph should examine one main comparison point and connect it to your thesis. A useful paragraph structure includes a topic sentence, evidence about both subjects, analysis of the relationship between them, and a sentence that reinforces the paragraph’s main point.

    For example, a paragraph about flexibility might explain how online courses can allow students to access recorded materials at different times. It could then compare this with the scheduled sessions commonly associated with classroom-based courses. The analysis should explain why the distinction matters, while acknowledging that some online courses also have fixed attendance requirements.

    Use evidence, examples, and careful reasoning to support your claims. Avoid describing Subject A in one paragraph and Subject B in another without explaining how the information relates.

    Transitions such as similarly, in contrast, whereas, both, and however can make the relationship between ideas clearer. Use them naturally rather than inserting transition words into every sentence.

    Step 9: Write a Meaningful Conclusion

    The conclusion should bring the comparison together and explain what the analysis demonstrates. Restate the thesis in fresh language, summarize the most significant similarities and differences, and emphasize the broader insight gained from comparing the subjects.

    Do not simply repeat the body paragraphs one by one. Instead, explain which comparison points matter most and why.

    For example, an essay about learning methods might conclude that neither approach is automatically more effective in every situation. Their relative strengths depend on course design, learning objectives, available resources, and student needs.

    Avoid introducing major new evidence in the conclusion. The purpose is to synthesize the analysis and provide a clear ending to the argument.

    Example Outline for a Compare-and-Contrast Essay

    Suppose your assignment asks you to compare online learning and traditional classroom learning.

    Title: Online Learning vs. Traditional Classroom Learning

    Introduction

    • Introduce the growing range of university learning environments.
    • Identify the two approaches.
    • Present a thesis about their differences in flexibility, interaction, and learning structure.

    Body paragraph 1: Scheduling and flexibility

    • Explain how each approach organizes learning time.
    • Compare the benefits and limitations of each arrangement.
    • Connect the comparison to student needs.

    Body paragraph 2: Interaction

    • Examine how students communicate with instructors and classmates.
    • Compare face-to-face interaction with online communication.
    • Discuss how course design affects participation.

    Body paragraph 3: Access to resources

    • Compare digital materials with resources available in classroom settings.
    • Consider technology access and physical attendance requirements.
    • Explain why these factors influence learning opportunities.

    Conclusion

    • Summarize the main comparison.
    • Explain why context matters when evaluating each approach.
    • Reinforce the thesis without introducing unrelated claims.

    This outline keeps the essay focused and ensures that each body paragraph contributes to the central argument.

    Common Mistakes to Avoid

    Listing Differences Without Analysis

    A list of similarities and differences does not automatically create a strong essay. Explain why each point matters and how it contributes to the overall argument.

    Using Unfair Comparison Criteria

    Do not judge one subject by one standard and the other by a different standard. Apply consistent criteria so readers can follow your reasoning.

    Choosing Too Many Comparison Points

    Trying to discuss every possible feature can make the essay superficial. Select the most relevant points and analyze them in sufficient detail.

    Repeating the Same Information

    Avoid restating a comparison without adding evidence or interpretation. Each paragraph should contribute a distinct idea.

    Using Unsupported Generalizations

    Statements such as “online learning is always easier” or “classroom teaching is better” oversimplify complex issues. Qualify claims and support them with relevant evidence.

    Forgetting the Thesis

    Every major paragraph should connect to the central argument. If a comparison point does not help answer the assignment question, consider removing it.

    Compare-and-Contrast Essay Checklist

    Before submitting your essay, check the following:

    • I have answered the assignment question directly.
    • Both subjects are clearly identified.
    • My comparison points are relevant and consistent.
    • My thesis states the main insight of the essay.
    • I have chosen a logical structure.
    • Each body paragraph has one clear focus.
    • I have explained the significance of similarities and differences.
    • My claims are supported by appropriate evidence.
    • I have used transitions to clarify relationships between ideas.
    • My conclusion synthesizes the comparison.
    • I have checked grammar, spelling, formatting, and citations.

    Frequently Asked Questions

    What is the best structure for a compare-and-contrast essay?

    The point-by-point method is useful when you want to compare both subjects directly under the same criteria. The block method can work well when each subject needs a detailed explanation before the comparison is brought together. Choose the structure that best suits your topic and assignment.

    How many paragraphs should a compare-and-contrast essay have?

    The required length depends on the assignment. A short essay might contain an introduction, three body paragraphs, and a conclusion. A longer university paper may need additional paragraphs for evidence, context, and more detailed analysis. Follow your instructor’s word count and marking criteria.

    Does a compare-and-contrast essay need a thesis statement?

    Yes, in most academic assignments. A thesis gives the comparison a purpose and helps readers understand the main point you will establish. It should do more than announce that two subjects are being compared.

    Can I include both similarities and differences in one paragraph?

    Yes. In the point-by-point method, each paragraph often compares both subjects using one shared criterion. In the block method, similarities and differences may be discussed in separate sections before the overall comparison is synthesized.

    How do I make my compare-and-contrast essay more analytical?

    Choose meaningful criteria, use evidence for both subjects, explain why the comparison matters, and connect each paragraph to your thesis. Instead of merely stating that two subjects differ, examine the reasons for the difference and its implications.

    Conclusion

    Learning how to write a compare and contrast essay involves more than identifying what two subjects have in common and where they differ. A strong essay uses a clear thesis, consistent comparison criteria, appropriate evidence, and a logical structure to develop a meaningful argument.

    Begin by understanding your assignment, selecting suitable subjects, and organizing your research. Then choose the block or point-by-point method, write focused body paragraphs, and explain why the comparison matters. Finish by checking that your conclusion reinforces the central insight and that every major claim is supported.

    With careful planning and critical analysis, you can produce a compare-and-contrast essay that is clear, balanced, and academically persuasive.

  • How to Write a Problem-Solution Essay

    How to Write a Problem-Solution Essay

    A problem-solution essay is an academic assignment that examines a specific issue and presents practical ways to address it. Rather than simply describing a problem, this type of essay explains why the issue matters, explores its causes, evaluates possible solutions, and recommends an approach supported by evidence. Students often write problem-solution essays about education, technology, public health, environmental challenges, and social issues.

    Learning how to write a problem solution essay involves more than identifying a problem and suggesting a quick fix. A strong essay defines the issue clearly, demonstrates its significance, considers realistic solutions, and explains why the recommended approach is likely to work. With a logical structure and careful research, students can develop an argument that is clear, persuasive, and academically sound.

    This guide explains each stage of the writing process, from choosing a focused topic to revising the final draft.

    What Is a Problem-Solution Essay?

    A problem-solution essay identifies an issue, explains its causes or consequences, and proposes one or more ways to address it. The purpose is to help readers understand the problem and evaluate a reasonable response.

    For example, an essay about low student participation in classroom discussions might explain the causes, such as fear of making mistakes, unclear expectations, or limited opportunities to contribute. It could then recommend strategies such as small-group discussions, anonymous question submissions, and structured participation activities.

    A well-developed problem-solution essay usually includes four main elements:

    • Problem: A clear explanation of the issue being examined.
    • Causes and effects: An analysis of why the problem occurs and how it affects people or organizations.
    • Solutions: Practical responses that address the underlying causes.
    • Evaluation: Reasons the recommended solution is appropriate, achievable, and likely to produce meaningful results.

    The strongest essays connect these elements instead of treating them as unrelated sections.

    Step 1: Choose a Focused Problem

    The first step is selecting a problem that is specific enough to analyze within the assignment’s word limit. Broad topics often produce vague arguments because they cover too many causes, consequences, and potential solutions.

    For example, “environmental pollution” is too broad for a short essay. A more focused topic would be “reducing single-use plastic waste in university cafeterias.” This narrower issue has identifiable causes, affected groups, and potential responses.

    When choosing a topic, consider the following questions:

    • Is the problem clearly defined?
    • Does it affect a particular group, community, institution, or environment?
    • Can reliable information help explain its causes and effects?
    • Are there realistic solutions worth evaluating?
    • Is the topic appropriate for the assignment’s scope?

    Choose an issue that allows you to make a meaningful argument rather than simply describe a situation. Your goal is to investigate a problem and demonstrate how it could be addressed.

    Step 2: Research the Causes and Effects

    Before proposing solutions, understand why the problem exists. Research helps distinguish the underlying causes of an issue from its visible symptoms.

    Suppose your topic is poor time management among university students. Possible contributing factors might include competing deadlines, unrealistic study plans, distractions, or difficulty estimating how long tasks will take. The consequences could include rushed assignments, increased stress, and reduced time for revision.

    Use credible academic studies, books, institutional reports, and other reliable sources to support your analysis. Compare information from different sources and pay attention to evidence that challenges your initial assumptions.

    Organize your research into three categories:

    1. Causes: What conditions or behaviors contribute to the problem?
    2. Effects: Who is affected, and what happens when the problem continues?
    3. Existing responses: What has already been tried, and what were the results?

    This preparation prevents you from recommending a solution that addresses only a symptom. If the problem has several causes, determine which ones your essay can reasonably address.

    Step 3: Write a Clear Thesis Statement

    The thesis statement presents the central argument of your essay. It should identify the problem and indicate the main solution or approach you will defend.

    A weak thesis might say, “Students have problems managing their time.” This statement identifies a general concern but does not offer a clear argument.

    A stronger thesis would be: “Universities can help students manage academic workloads by teaching practical planning techniques, breaking large assignments into milestones, and providing early access to academic support.”

    This thesis is more effective because it identifies a problem, proposes specific responses, and gives the essay a clear direction.

    A useful thesis statement should be:

    • Specific: It identifies the issue rather than making a broad claim.
    • Debatable: It presents an argument that can be supported and evaluated.
    • Practical: It proposes a response that could reasonably address the problem.
    • Focused: It fits the scope of the assignment.

    Avoid promising to solve an issue completely unless your evidence justifies that claim. In many cases, the goal is to reduce the problem or improve the situation rather than eliminate every contributing factor.

    Step 4: Create a Logical Essay Outline

    An outline organizes the argument before you begin writing full paragraphs. It also helps you identify missing evidence and avoid repeating the same point.

    A common problem-solution essay structure includes an introduction, several body paragraphs, and a conclusion.

    Introduction

    Begin with a relevant fact, a brief example, or a question that helps readers understand the issue. Provide enough background to explain why the problem matters, then state your thesis.

    Avoid starting with an overly broad statement that could apply to almost any topic. Connect the opening directly to the problem you will analyze.

    Body Paragraph 1: Explain the Problem

    Define the issue and show why it deserves attention. Include evidence, examples, or relevant statistics when available. Explain who is affected and what may happen if the problem remains unresolved.

    Body Paragraph 2: Analyze the Causes

    Discuss the main factors contributing to the problem. Explain how these factors interact and why they make the issue difficult to address. Use evidence to support important claims.

    Body Paragraph 3: Present the Main Solution

    Introduce your strongest proposed solution. Explain how it works, who would implement it, and what resources or actions would be required. Connect the proposed action directly to the causes discussed earlier.

    Body Paragraph 4: Evaluate the Solution

    Explain why the solution is appropriate and what benefits it could produce. Acknowledge possible limitations, costs, or implementation challenges. If useful, compare it with an alternative and explain why your recommendation is stronger.

    Conclusion

    Restate the central argument in fresh language, summarize the most important reasoning, and explain the value of taking action. Do not introduce a completely new solution or a major piece of evidence in the final paragraph.

    Depending on the assignment, you may combine the causes and effects into one section or discuss several solutions in separate paragraphs. The structure should serve your argument rather than force every topic into an identical format.

    Step 5: Develop Practical and Relevant Solutions

    The solution section is the heart of a problem-solution essay. A proposal may sound appealing but remain unconvincing if it is vague, expensive, unrealistic, or unrelated to the actual causes of the problem.

    For each proposed solution, answer four questions:

    1. What should be done? Describe the action in specific terms.
    2. Who should take action? Identify the people, institution, or organization responsible.
    3. How would it work? Explain the process, resources, and important steps.
    4. Why should it help? Connect the proposal to the problem’s causes and support the reasoning with evidence.

    Consider the issue of food waste in a university dining hall. Saying “students should waste less food” is a general recommendation, not a developed solution. More practical measures could include offering smaller initial portions, allowing students to request additional servings, tracking discarded food, and adjusting meal preparation based on demand.

    These actions are specific enough to evaluate. You could also discuss limitations, such as staffing requirements, changes to meal service, or the need to measure waste over time.

    If you present multiple solutions, prioritize them. A focused essay with one well-supported recommendation may be more persuasive than a list of many ideas with little explanation.

    Step 6: Support Your Argument With Evidence

    A convincing essay relies on more than personal opinion. Evidence helps establish the seriousness of the problem and shows why a proposed solution deserves consideration.

    Useful forms of support include:

    • Findings from peer-reviewed research.
    • Relevant government or institutional reports.
    • Reliable data that demonstrates the scale of the problem.
    • Realistic examples or case studies.
    • Expert analysis that explains how a proposed response may work.

    After introducing evidence, interpret it. Do not assume readers will automatically understand its significance. Explain how the information supports your claim and how it relates to the proposed solution.

    For instance, if research indicates that breaking complex assignments into smaller milestones helps students monitor their progress, explain how milestone deadlines could reduce last-minute work. Do not claim that this approach guarantees better grades unless the evidence supports that conclusion.

    Use appropriate citations in the format required by your instructor. Paraphrase sources accurately, distinguish your own analysis from published findings, and avoid relying on unsupported statistics or unverified claims.

    Step 7: Address Objections and Limitations

    Strong academic writing recognizes that solutions often involve trade-offs. Acknowledging limitations makes your argument more credible because it demonstrates that you have considered practical challenges.

    For example, a proposal to introduce additional tutoring sessions may help students who need academic support, but it could require funding, staff availability, and scheduling changes. You can explain how these challenges might be reduced through targeted sessions, peer tutoring, or a gradual pilot program.

    You do not need to discuss every possible objection. Focus on the most important limitations and explain why your recommendation remains reasonable despite them.

    Avoid dismissing alternative viewpoints or presenting your preferred solution as perfect. A balanced argument is usually more persuasive than an exaggerated promise.

    Common Mistakes to Avoid

    Even a well-chosen topic can produce a weak essay if the reasoning is incomplete. Watch for these common problems:

    Choosing a topic that is too broad. Narrow the issue to a specific setting, group, or outcome that you can examine in sufficient detail.

    Describing the problem without analyzing it. Explain its causes and effects instead of assuming readers will recognize why it matters.

    Offering vague solutions. Replace statements such as “people should be more responsible” with clear actions and identifiable responsibilities.

    Ignoring feasibility. Consider whether the proposal can realistically be implemented with available time, resources, and authority.

    Using evidence without analysis. Explain what each important piece of evidence demonstrates and how it supports your reasoning.

    Repeating the thesis without adding insight. Use the conclusion to synthesize the argument and reinforce why the recommended response matters.

    Making unsupported promises. Use careful language and acknowledge uncertainty when outcomes depend on several factors.

    Problem-Solution Essay Checklist

    Before submitting your essay, review the following checklist:

    • The topic focuses on a clearly defined problem.
    • The introduction explains why the issue matters.
    • The thesis identifies the main argument or recommended approach.
    • The essay analyzes important causes and consequences.
    • Each solution responds to a cause identified in the essay.
    • The recommendations are specific, realistic, and explained.
    • Reliable evidence supports important claims.
    • Limitations or objections are addressed where relevant.
    • Paragraphs follow a logical order and use clear transitions.
    • The conclusion reinforces the argument without introducing a new major point.
    • Grammar, clarity, citations, and assignment requirements have been checked.

    Frequently Asked Questions

    How long should a problem-solution essay be?

    The required length depends on the course and instructor. A short assignment may require only a few paragraphs, while a university essay may need several pages of research and analysis. Follow the assigned word count and make sure every section contributes to the argument.

    Can a problem-solution essay include more than one solution?

    Yes. You can compare several approaches before recommending one, or explain how complementary actions could work together. However, each solution should be relevant to the problem and supported by clear reasoning.

    Should I explain the causes before presenting solutions?

    Usually, yes. Explaining the causes helps readers understand why a particular response is appropriate. It also allows you to show that your recommendations address the underlying issue rather than its symptoms.

    What makes a problem-solution essay persuasive?

    A persuasive essay combines a focused thesis, careful problem analysis, practical recommendations, credible evidence, and a fair discussion of limitations. The connection between the problem and the proposed solution should be clear throughout the paper.

    What is the difference between a problem-solution essay and an argumentative essay?

    A problem-solution essay focuses on defining an issue and evaluating ways to address it. An argumentative essay may defend a position on any debatable question, including questions that do not require a practical solution. Both forms need clear claims and supporting evidence, but their main purposes differ.

    Conclusion

    Learning how to write a problem solution essay requires a structured approach to research, reasoning, and academic writing. Start with a focused issue, investigate its causes and effects, and develop a thesis that guides the discussion. Then organize the essay logically, present practical solutions, support your recommendations with credible evidence, and acknowledge relevant limitations.

    The most effective problem-solution essays do more than list ideas. They explain why the problem exists, demonstrate how a proposed response addresses it, and give readers sound reasons to consider that response. With careful planning, specific examples, and thorough revision, you can produce an essay that is clear, balanced, and convincing.

  • How to Create an Effective Assessment Rubric

    How to Create an Effective Assessment Rubric

    An effective assessment rubric helps teachers evaluate student work fairly, communicate expectations clearly, and provide feedback that supports learning. Whether you are grading essays, presentations, research projects, practical activities, or group assignments, a well-designed rubric makes it easier to judge performance against consistent standards. It also helps students understand what quality work looks like before they begin an assignment.

    Learning how to create an assessment rubric involves more than making a table and assigning points. Teachers need to identify the learning objectives, choose meaningful assessment criteria, describe different levels of performance, and establish a scoring system that students can understand. When these elements work together, a rubric can improve transparency, consistency, and the usefulness of feedback.

    This guide explains how to design an assessment rubric step by step, with practical examples, common mistakes to avoid, and strategies for using rubrics to improve teaching and learning.

    What Is an Assessment Rubric?

    An assessment rubric is a scoring guide that describes the criteria used to evaluate a student’s work and explains what different levels of performance look like. It provides a structured way to judge whether an assignment meets its intended learning goals.

    Most rubrics contain three main components:

    • Assessment criteria: The specific qualities or skills being evaluated, such as argument development, subject knowledge, organization, or use of evidence.
    • Performance levels: Categories that describe different degrees of achievement, such as excellent, proficient, developing, and beginning.
    • Descriptors or scoring guidelines: Statements explaining what performance at each level looks like, sometimes accompanied by points or percentages.

    For example, a presentation rubric might assess content accuracy, organization, delivery, visual support, and responses to questions. Each criterion has performance descriptions that help teachers distinguish strong work from work that needs improvement.

    Rubrics can be used for formative assessment, where the goal is to guide learning during a task, and summative assessment, where teachers evaluate achievement at the end of a unit or course.

    Step 1: Identify the Learning Objectives

    Before deciding how to score an assignment, determine what students should learn or demonstrate. The rubric should measure the skills and knowledge that matter most for the task.

    Start by reviewing the assignment instructions, curriculum standards, and learning objectives. Ask yourself what successful completion should demonstrate. For an academic essay, the objectives might include constructing a clear argument, supporting claims with relevant evidence, organizing ideas logically, and using appropriate academic language.

    Avoid evaluating skills that are unrelated to the learning goals. For example, if an assignment assesses scientific reasoning, neat handwriting should not receive substantial weight unless presentation is an explicit objective.

    A useful way to begin is to complete this sentence: “By completing this assignment, students should be able to…” The answer helps you identify the abilities the rubric needs to assess.

    Clear objectives make the rest of the design process easier because every criterion and performance descriptor can be connected to a specific educational purpose.

    Step 2: Choose Clear and Relevant Assessment Criteria

    Assessment criteria explain which aspects of the work will be evaluated. Select criteria that directly reflect the learning objectives and are important to the assignment’s success.

    For a research paper, appropriate criteria might include:

    • Quality and clarity of the central argument.
    • Accuracy and depth of subject knowledge.
    • Relevance and credibility of supporting evidence.
    • Organization and coherence.
    • Citation practices and academic integrity.
    • Grammar and academic style, when relevant to the learning objectives.

    Each criterion should measure a distinct aspect of performance. Overlapping criteria can cause the same weakness to be penalized multiple times. For example, “organization,” “logical structure,” and “paragraph sequence” may be too similar to score independently unless their meanings are clearly distinguished.

    Use specific labels rather than vague terms. “Use of evidence” is more informative than “quality,” while “explains how evidence supports the main claim” is more precise still.

    It is also important to limit the number of criteria. A rubric with too many categories can become difficult to use and may distract from the assignment’s main learning goals. Select the criteria that matter most, and make sure students can understand them without needing a lengthy explanation.

    Step 3: Select the Right Type of Rubric

    Different assignments require different rubric formats. Choosing the right type depends on whether you need an overall judgment, detailed feedback, or a balance between the two.

    Analytic Rubric

    An analytic rubric scores each criterion separately. A research paper, for example, might receive distinct scores for argument, evidence, organization, and writing style.

    This format is useful when teachers want detailed feedback or need to identify students’ specific strengths and weaknesses. It can take longer to design and apply, but it provides a clearer picture of performance across different skills.

    Holistic Rubric

    A holistic rubric assigns one overall rating based on the quality of the work as a whole. Instead of scoring several criteria independently, the teacher selects the performance description that best matches the submission.

    Holistic rubrics can be useful for short responses, broad performance tasks, or situations where an overall judgment is more important than separate scores. However, they provide less detail about which skills need improvement.

    Single-Point Rubric

    A single-point rubric describes the expected standard for each criterion, leaving space for teachers to record strengths and areas for improvement. It focuses on what successful work should demonstrate rather than listing detailed descriptions for every possible performance level.

    This format can support descriptive feedback and student reflection, particularly when teachers want to encourage revision.

    Choose the format that best matches the task, available grading time, and type of feedback students need.

    Step 4: Define Performance Levels

    Performance levels show how well a student meets each criterion. Many rubrics use four levels, although three or five may be appropriate depending on the assignment.

    Common labels include:

    • Exemplary: The work demonstrates strong understanding and consistently meets or exceeds the intended standard.
    • Proficient: The work meets the expected standard with only minor weaknesses.
    • Developing: The work shows partial understanding but has noticeable gaps or inconsistencies.
    • Beginning: The work demonstrates limited understanding or requires substantial improvement.

    The labels themselves are not enough. Students need descriptions that explain the difference between levels. Avoid relying only on words such as “good,” “average,” or “poor,” because these terms can be interpreted differently by different teachers.

    Make the levels logically consistent. A student should be able to see what changes as performance improves, such as moving from an unsupported claim to a claim supported by relevant evidence and clear explanation.

    Step 5: Write Observable Performance Descriptors

    Performance descriptors are the statements that explain what a particular level looks like for each criterion. They are central to an effective assessment rubric because they guide both grading and improvement.

    Consider the criterion “use of evidence” in a research essay.

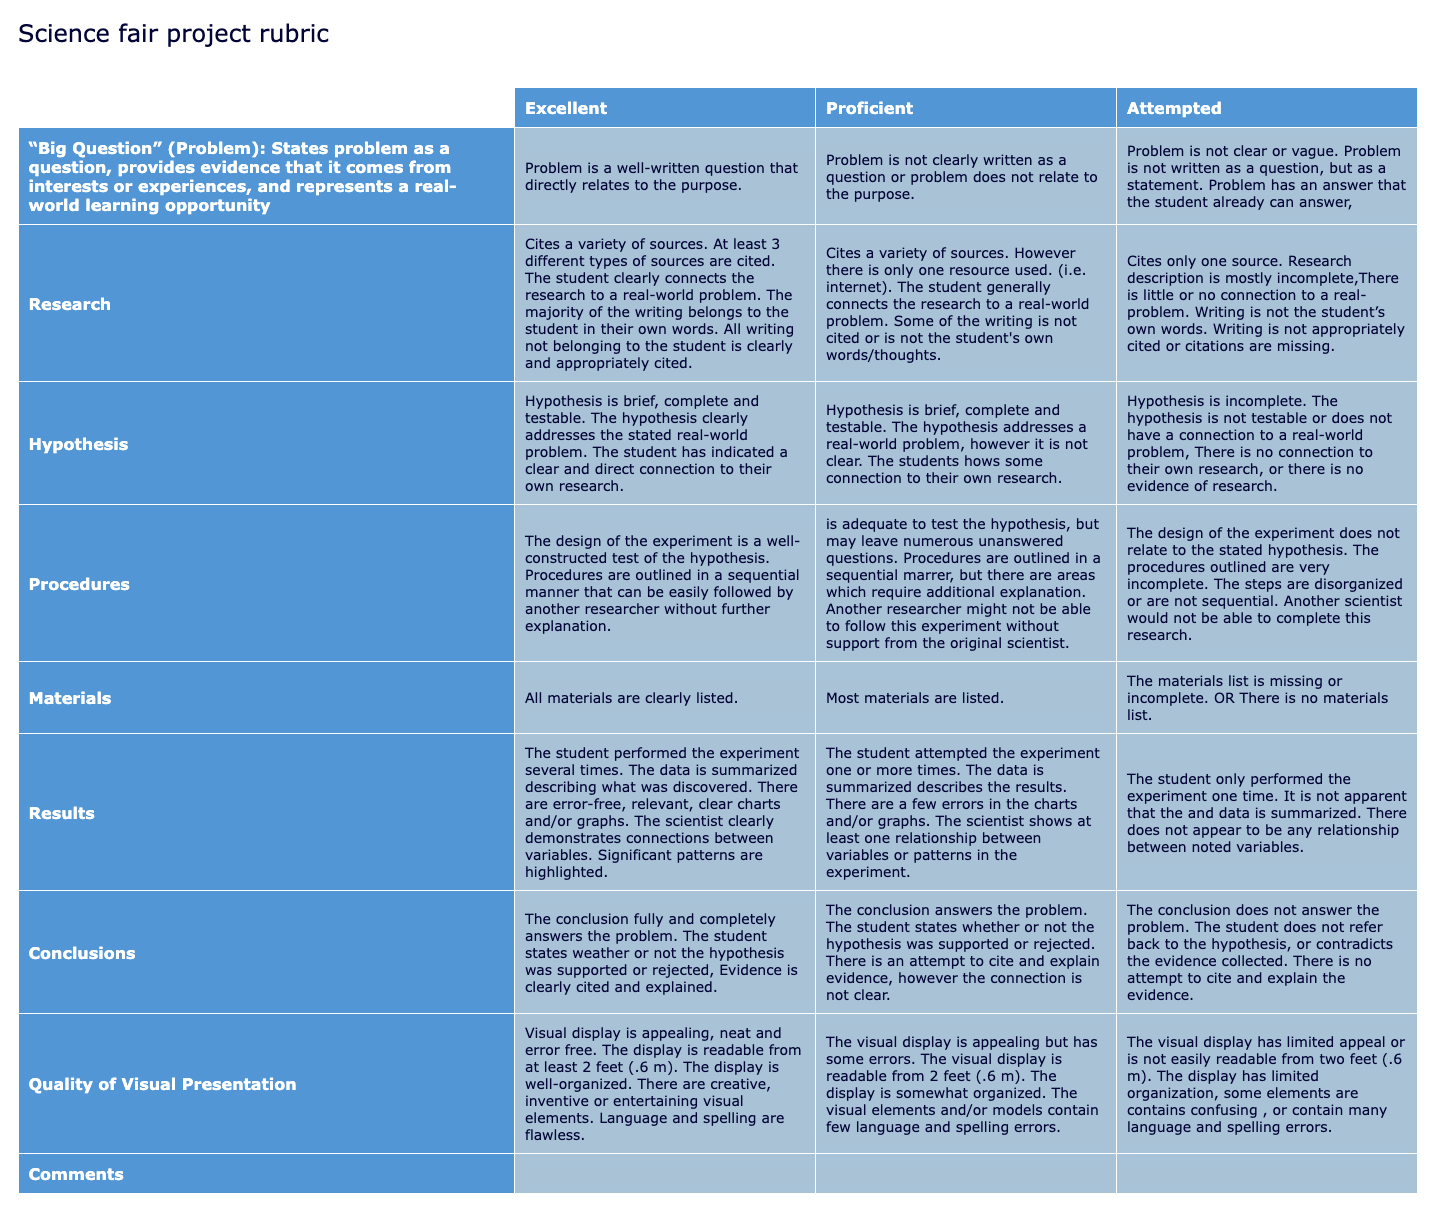
    Performance levelExample descriptor
    ExemplaryIntegrates relevant, credible evidence and clearly explains how it supports the argument.
    ProficientUses relevant evidence to support most claims, with generally clear explanation.
    DevelopingIncludes some relevant evidence, but connections to the argument are inconsistent or underexplained.
    BeginningProvides little relevant evidence or does not explain how the evidence supports the argument.

    These descriptors are more useful than assigning a numerical score to “evidence quality” without explaining what that score means.

    Use language that describes observable work. Terms such as “identifies,” “explains,” “compares,” “supports,” and “analyzes” make expectations clearer. Avoid descriptors that judge a student’s personality, effort, or presumed ability rather than the quality of the submitted work.

    Also ensure that each level describes a meaningful difference in performance. If the descriptions for adjacent levels are nearly identical, graders may struggle to decide which score is appropriate.

    Step 6: Establish a Fair Scoring System

    Once the criteria and performance levels are defined, decide how scores will be assigned. A simple system may award four points for exemplary work, three for proficient work, two for developing work, and one for beginning work. Some rubrics use percentages or weighted points instead.

    Not every criterion necessarily deserves equal weight. In a research assignment, the quality of the argument and use of evidence might be more important than formatting details. Assign weights according to the learning objectives, not simply according to which criteria are easiest to score.

    For example, a 100-point research paper rubric might allocate:

    • Argument and thesis: 30 points.
    • Evidence and analysis: 30 points.
    • Organization: 20 points.
    • Academic style and clarity: 10 points.
    • Citation and formatting requirements: 10 points.

    These values are illustrative rather than universal. Adjust the distribution to fit the assignment and explain the scoring rules before students begin.

    Check that the total points add up correctly and that the method for calculating the final grade is easy to follow. If some criteria have different weights, provide a clear explanation so students can understand how their work will be evaluated.

    Step 7: Review the Rubric for Fairness and Accessibility

    A rubric should measure the intended learning outcomes without introducing irrelevant barriers. Review each criterion to make sure it does not unintentionally favor a particular writing style, background, or way of participating when that characteristic is not part of the learning objective.

    Use plain language and explain any specialist terminology. Students should be able to understand what is expected, even if they are unfamiliar with assessment jargon.

    Consider accessibility when designing the assignment itself. If students can demonstrate the required knowledge through more than one permitted format, make sure the rubric evaluates the same essential learning objectives across those formats. Any alternative format should preserve the intended standard rather than quietly changing what is being assessed.

    For group projects, distinguish individual accountability from team performance when both matter. A shared score may reflect the final product, while individual reflection or contribution evidence can help assess each student’s learning.

    Finally, review the rubric for bias, unclear expectations, and criteria that might unintentionally reward resources students were never expected to have.

    Step 8: Test and Refine the Rubric

    Before using a rubric for a major assignment, test it against sample work or examples from previous tasks, where appropriate. This helps reveal unclear descriptors and scoring rules that do not work as intended.

    If several teachers will use the same rubric, discuss how you would score a sample submission. Compare decisions and identify where interpretations differ. This process, often called calibration, can improve consistency across graders.

    Ask students whether the criteria and performance descriptions are understandable. Their questions may reveal expectations that seemed obvious to the teacher but were not clear to the class.

    After grading, review whether the rubric helped distinguish different levels of work. If most students receive the same score for a criterion, check whether the descriptors are too broad or whether the task provided enough opportunity to demonstrate different levels of performance.

    Treat the rubric as a tool that can be improved. Small revisions based on actual classroom experience can make future assessment clearer and more useful.

    Common Mistakes to Avoid

    Even carefully planned rubrics can create problems when their design is unclear. Avoid these common mistakes:

    Using vague descriptors. Replace subjective words such as “excellent” with specific descriptions of the work students should demonstrate.

    Including too many criteria. Focus on the most important learning outcomes instead of scoring every small feature of an assignment.

    Overlapping criteria. Make sure each category measures a distinct skill to avoid double-penalizing the same weakness.

    Giving every criterion equal weight automatically. Weight criteria according to their importance to the learning objectives.

    Sharing the rubric too late. Provide it before students begin so they can use it to plan, monitor, and improve their work.

    Ignoring student feedback. Review common questions and grading difficulties to identify where instructions need improvement.

    Treating the score as the only feedback. Explain what students did well and what they can do next, especially when the rubric is used to support learning.

    How to Use an Assessment Rubric to Improve Learning

    An assessment rubric is most valuable when it becomes part of the learning process rather than a document used only after an assignment is submitted.

    Share the rubric in advance and discuss examples of work that illustrate different performance levels. Encourage students to use the criteria to plan their approach, review a draft, or check whether they have met the assignment’s main expectations.

    Rubrics can also support peer assessment. Students can use the same criteria to give each other focused feedback, provided they understand the standards and know how to explain their judgments respectfully.

    After returning graded work, connect comments to the relevant criteria. Instead of writing “needs improvement,” explain which part of the argument requires more evidence or where the organization makes the reasoning difficult to follow. Students can then use that information in future assignments.

    Teachers can also analyze patterns in rubric results. If many students struggle with the same criterion, it may indicate a need for additional instruction, clearer directions, or more opportunities to practice that skill.

    Conclusion

    Learning how to create an assessment rubric starts with clear learning objectives and continues through careful selection of criteria, performance levels, descriptors, and scoring rules. A strong rubric makes expectations visible, supports more consistent grading, and helps students understand how to improve their work.

    The most effective rubrics are specific enough to guide decisions but simple enough to use efficiently. They evaluate meaningful learning outcomes, avoid unnecessary complexity, and provide feedback students can act on. By testing rubrics, reviewing their fairness, and refining them after use, teachers can build assessment tools that support both reliable evaluation and better learning.

  • Project-Based Learning Examples for Teachers

    Project-Based Learning Examples for Teachers

    Project-based learning gives students opportunities to investigate meaningful questions, solve problems, and create work that demonstrates their understanding. Instead of learning concepts only through lectures or worksheets, students apply knowledge through research, collaboration, experimentation, and practical decision-making. For teachers, this approach can make lessons more engaging while helping learners develop communication, critical thinking, creativity, and problem-solving skills.

    Finding suitable project based learning examples is a useful starting point for educators who want to introduce this teaching method into their classrooms. A successful project does not need expensive equipment, complicated technology, or several months of preparation. It needs a clear learning objective, a meaningful question, manageable steps, and a final product that allows students to demonstrate what they have learned.

    This guide explores practical project ideas for different subjects and age groups, explains how to plan an effective project, and offers assessment strategies teachers can use to keep learning on track.

    What Is Project-Based Learning?

    Project-based learning, often called PBL, is an instructional approach in which students develop knowledge and skills by investigating a question, challenge, or real-world problem over an extended period. They use subject knowledge to create a product, presentation, proposal, performance, or other meaningful outcome.

    A strong project is more than a fun activity at the end of a unit. Students should learn important concepts through the project itself, make decisions, use evidence, receive feedback, and revise their work.

    For example, students studying environmental science might investigate how their school could reduce waste. They could collect data, identify common sources of waste, compare possible solutions, and present a practical recommendation to school leaders.

    Effective projects typically include:

    • A challenging question connected to curriculum objectives.
    • Student investigation and meaningful decision-making.
    • Opportunities to apply knowledge and practice relevant skills.
    • Feedback, reflection, and revision.
    • A final product or presentation for an audience.

    These elements help teachers connect academic learning with practical applications.

    1. School Waste Reduction Project

    Suitable subjects: Science, mathematics, social studies, and language arts.

    A school waste reduction project encourages students to investigate how everyday choices affect the environment. Rather than simply reading about recycling, learners collect information about waste in their own school and develop evidence-based recommendations.

    Driving question: How can our school reduce waste without disrupting daily activities?

    How to organize the project

    Begin by discussing different forms of waste, including paper, packaging, food, and disposable materials. Ask students to predict which types are most common in the school.

    Next, organize a safe and appropriate waste audit using observations, existing records, or clean sample materials. Students can record quantities, categorize findings, and create charts to identify patterns. They then research possible interventions, such as clearer recycling labels, reusable materials, or changes to paper use.

    Teams prepare a proposal that explains the problem, presents evidence, estimates costs where possible, and recommends practical actions. Their final products could include posters, presentations, infographics, or a short report for school administrators.

    Assessment ideas: Evaluate the quality of the data, accuracy of the analysis, practicality of the recommendations, and clarity of the presentation.

    This project helps students apply mathematics and scientific reasoning while learning to make decisions based on evidence.

    2. Design a Sustainable School Garden

    Suitable subjects: Biology, environmental science, mathematics, art, and design.

    A school garden project allows students to explore plant growth, ecosystems, nutrition, and sustainable resource use. It can be adapted to schools with outdoor space or completed as a smaller container-gardening activity.

    Driving question: How can we design a garden that grows healthy plants while using resources responsibly?

    Students begin by investigating which plants grow well in their local climate and what conditions they need. They measure the available space, compare planting options, and create a garden plan.

    Teams can research soil requirements, sunlight, water use, and suitable plant varieties. They then produce a scaled drawing or model showing where plants will grow and how the garden will be maintained. If practical, students can plant a small garden and monitor its development over several weeks.

    Learners record observations, measure growth, and compare results with their initial predictions. They can also consider composting, water conservation, and the role of pollinators.

    Assessment ideas: Use a rubric covering scientific understanding, planning accuracy, quality of observations, collaboration, and reflection.

    The project gives students a practical reason to collect data and understand how environmental conditions affect living things.

    3. Create a Student Budget Challenge

    Suitable subjects: Mathematics, economics, personal finance, and digital literacy.

    Financial decision-making is a useful context for applying percentages, addition, subtraction, estimation, and data interpretation.

    Driving question: How can a student plan a realistic budget for a specific goal while staying within a fixed amount?

    Provide each team with a scenario, such as planning a class event, organizing a day trip, or managing a fictional monthly student budget. Set a clear spending limit and provide a list of realistic or clearly labeled sample prices.

    Students identify essential expenses, compare alternatives, calculate totals, and decide how to allocate their funds. They should explain the reasoning behind their choices rather than simply selecting the cheapest items.

    For a class event, learners might estimate costs for materials, transportation, refreshments, and activities. They can then revise their plans when given a new constraint, such as a reduced budget or an unexpected expense.

    The final product could be a budget spreadsheet, written proposal, or presentation explaining the decisions.

    Assessment ideas: Check calculation accuracy, justification of choices, realistic planning, and the ability to revise a budget when circumstances change.

    This project shows students how mathematical concepts support everyday decisions.

    4. Develop a Community History Exhibition

    Suitable subjects: History, language arts, social studies, media literacy, and art.

    A community history exhibition helps students investigate how a place, institution, or local tradition has changed over time. It also introduces research methods, source evaluation, and the importance of representing different perspectives.

    Driving question: How can we tell an accurate and engaging story about our community’s past?

    Students select a focused topic, such as changes in local transportation, the history of a public building, traditional crafts, or the development of a community celebration. They gather information from reliable publications, historical records, photographs, and voluntary interviews when appropriate.

    Teach students to distinguish firsthand accounts from later interpretations and to verify important claims using more than one source. They should obtain permission before using personal photographs or interview material and avoid sharing private information without consent.

    Teams organize their findings into an exhibition with captions, timelines, maps, audio presentations, or written narratives. They must decide which information is essential and how to communicate it accurately.

    Assessment ideas: Evaluate research quality, source credibility, historical reasoning, organization, and responsible use of materials.

    The finished exhibition can be shared with classmates, families, or the wider school community.

    5. Design a Solution to a Classroom Problem

    Suitable subjects: Engineering, science, mathematics, design, and language arts.

    Students can use an engineering design process to improve a familiar part of their learning environment.

    Driving question: How can we make one part of our classroom safer, more accessible, or more efficient?

    Possible challenges include improving the organization of shared materials, designing a stable book holder, creating a quieter independent-work area, or developing a more effective system for distributing classroom resources.

    Start by asking students to observe the current situation and identify a specific need. They then establish design requirements, brainstorm ideas, sketch possible solutions, and create a simple prototype using appropriate materials.

    Teams test their designs against agreed criteria. For example, a storage solution might be evaluated for stability, ease of use, capacity, and cost. Students record what worked, identify weaknesses, and revise their prototypes.

    Assessment ideas: Focus on problem definition, application of design principles, testing, evidence-based revision, and explanation of the final design.

    The project encourages students to treat unsuccessful attempts as useful information rather than as reasons to stop trying.

    6. Produce a Public Health Awareness Campaign

    Suitable subjects: Biology, health education, language arts, art, and digital media.

    A public health campaign lets students examine how accurate information can support informed decisions. Topics might include hand hygiene, sleep habits, hydration, safe food handling, or the importance of physical activity.

    Driving question: How can we communicate reliable health information in a way that helps our school community make informed choices?

    Students choose a teacher-approved topic and identify the audience they want to reach. They research the topic using credible health information and separate established findings from opinions or unsupported claims.

    Teams develop a campaign through posters, presentations, short videos, or informational leaflets. They must adapt the message to their audience without exaggerating evidence or making promises that the research cannot support.

    Before presenting, students review their materials for accuracy, clarity, accessibility, and respectful language. The final campaign could be shared in class or displayed in an approved school setting.

    Assessment ideas: Assess research accuracy, communication quality, audience awareness, visual organization, and responsible handling of information.

    This project develops media literacy while giving students practice translating complex information into clear messages.

    7. Create a Student Podcast or Digital Magazine

    Suitable subjects: Language arts, media studies, history, science, and digital literacy.

    A podcast or digital magazine gives students an authentic reason to plan, research, write, edit, and communicate with an audience. The format can be adapted to different levels of digital access.

    Driving question: How can we create an informative publication that answers a question our audience cares about?

    Students choose a theme, such as book recommendations, local environmental issues, scientific discoveries, or school traditions. They investigate their topics, outline the main ideas, and prepare scripts or written articles.

    Groups assign responsibilities such as researcher, writer, editor, presenter, or designer. Each student should have a meaningful contribution, and roles can rotate to ensure that learners practice different skills.

    Before publication, students revise drafts, verify factual claims, check that sources are represented accurately, and obtain permission for any material that requires it. If recording equipment is unavailable, teams can produce a printed magazine or a simple classroom presentation instead.

    Assessment ideas: Use criteria for research, organization, writing quality, editing, collaboration, and responsible media use.

    The project supports communication skills and encourages students to think carefully about how information is produced and shared.

    How to Plan an Effective Project-Based Learning Unit

    The examples above can be adapted to different curricula, but effective planning is what turns an engaging idea into meaningful learning.

    Step 1: Start with the curriculum

    Identify the knowledge and skills students must demonstrate. Choose a project that requires them to use those skills rather than one that merely decorates the lesson.

    Step 2: Write a compelling driving question

    A strong question is open-ended enough to allow investigation but focused enough to guide the work. It should require students to apply knowledge, evaluate possibilities, or create something meaningful.

    Step 3: Break the project into milestones

    Divide the work into manageable stages, such as initial research, planning, first draft or prototype, feedback, revision, and final presentation. Establish checkpoints so students do not leave everything until the deadline.

    Step 4: Provide resources and scaffolding

    Give students access to suitable materials, examples, research guidance, and clear instructions. Use planning templates or checklists when needed, while leaving room for student decisions.

    Step 5: Build in feedback and revision

    Schedule opportunities for peer feedback, teacher conferences, testing, or draft review. Students should use the feedback to improve their work before the final submission.

    Step 6: Plan the final audience

    Students should know who will see or use the finished product. An audience might be classmates, another class, school staff, or a community group. Choose a format that is appropriate, safe, and realistic.

    How to Assess Project-Based Learning

    Assessment should measure both the learning process and the quality of the final product. A visually impressive poster, for example, does not necessarily demonstrate deep understanding of the subject.

    An analytic rubric can help teachers evaluate several dimensions separately:

    • Content knowledge: Does the work demonstrate accurate understanding?
    • Research and evidence: Are claims supported by relevant, credible information?
    • Problem-solving: Does the student explain decisions and respond to challenges?
    • Communication: Is the final product organized and appropriate for its audience?
    • Collaboration: Does the student contribute constructively when teamwork is part of the objective?
    • Reflection: Can the student explain what they learned and how their work changed?

    Share the criteria before students begin. Include individual checks, such as reflections, short explanations, or conferences, so that group products do not hide differences in individual learning.

    Use progress checks to identify difficulties early. If students struggle to find reliable information or divide tasks effectively, brief guidance may help them continue without taking control of the project away from them.

    Common Project-Based Learning Mistakes to Avoid

    Choosing a project without clear learning goals. Start with the knowledge and skills students need to develop, then select an appropriate project.

    Making the project too large. Match the scope to the available time, age group, resources, and curriculum.

    Allowing one student to do all the work. Assign meaningful responsibilities and include individual evidence of learning.

    Focusing only on the final product. Assess research, reasoning, revision, and understanding as well as presentation.

    Providing too little guidance. Student choice is valuable, but learners still need clear milestones, resources, and feedback.

    Using technology without a purpose. Choose digital tools only when they improve research, collaboration, creation, or communication.

    Conclusion

    Project-based learning gives students opportunities to connect classroom concepts with meaningful questions and practical challenges. From school waste reduction and garden design to budgeting, community history, engineering, and digital publishing, teachers can choose projects that suit their subjects, resources, and students’ interests.

    The most effective project based learning examples combine clear learning objectives, student investigation, manageable milestones, useful feedback, and thoughtful assessment. Begin with a focused question, guide students through the process, and make sure every learner has an opportunity to demonstrate understanding. With careful planning, project-based learning can turn academic knowledge into purposeful work that develops both subject expertise and transferable skills.
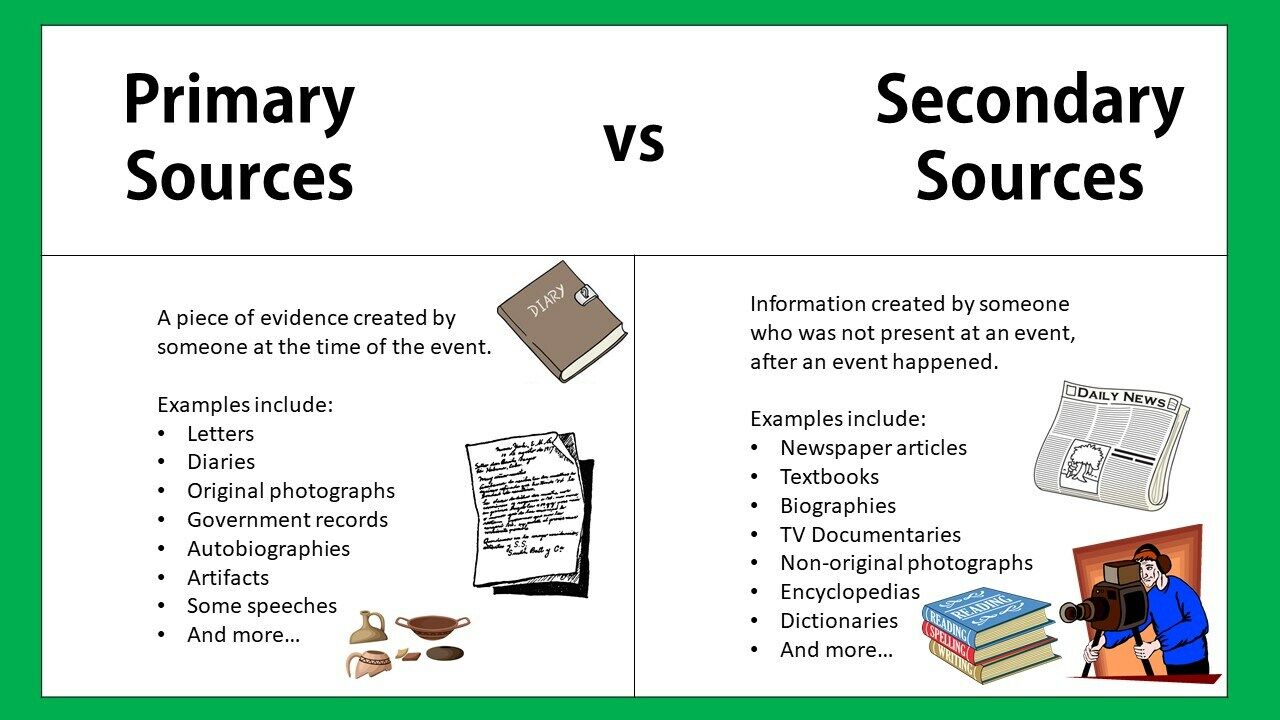
  • How to Choose the Right Online Course for Your Career

    How to Choose the Right Online Course for Your Career

    Online learning has made it easier than ever to develop professional skills, explore new industries, and prepare for career advancement. From technology and business to education, marketing, and healthcare administration, online courses offer flexible ways to gain knowledge without committing to a traditional classroom schedule. However, with so many programs available, choosing the right one can be challenging.

    Knowing how to choose the right online course involves more than comparing prices or selecting a popular subject. You need to identify your career goals, evaluate course quality, understand the skills employers value, and determine whether a program offers practical benefits. A well-chosen course can help you become more competitive, while a poorly matched program may consume time and money without moving you closer to your goals.

    This guide explains how to compare online courses, avoid common mistakes, and select training that supports your long-term professional development.

    1. Define Your Career Goals Before Choosing a Course

    Start by identifying what you want to achieve. Your career objective should guide every decision you make about online learning.

    For example, you might want to qualify for an entry-level position, improve your performance in your current job, prepare for a promotion, or transition into a different industry. Each goal requires a different learning approach.

    Consider these questions before enrolling:

    • Which skills do I need to improve?
    • What responsibilities do I want to handle in the future?
    • Do I need introductory knowledge or advanced training?
    • Is a professional certification required in my target field?
    • How will I use the knowledge after completing the course?

    Write down one specific outcome you hope to achieve. Instead of saying, “I want to learn technology,” set a clearer objective, such as learning to analyze business data or build a basic website.

    A defined goal helps you eliminate irrelevant options and focus on courses that offer skills you can apply.

    2. Research the Skills Employers Value

    A course may sound interesting but still have limited relevance to your career plans. Before choosing a program, investigate the skills and qualifications commonly requested in your target role.

    Review job descriptions from several employers and look for recurring requirements. These might include spreadsheet proficiency, project management, communication, programming, data visualization, or industry-specific knowledge.

    Pay attention to the difference between essential and preferred qualifications. If employers repeatedly request a particular technical skill, training in that area may be more useful than a broad course covering many unrelated subjects.

    You can also examine career progression in your chosen industry. Some positions require foundational knowledge, while others expect experience with specialized tools, advanced methods, or professional standards.

    Use your research to create a short list of priority skills. Then compare that list with the learning outcomes of potential courses.

    This approach connects your learning decisions to actual career needs instead of relying entirely on advertising or personal interest.

    3. Evaluate the Course Curriculum and Learning Outcomes

    The curriculum reveals what you are likely to learn and whether the program matches your objectives. Read the syllabus carefully before paying for enrollment.

    A strong course should explain its main topics, learning objectives, expected workload, and any prerequisites. Look for a logical progression from foundational concepts to more advanced material.

    For example, a beginner data analysis course might introduce data organization, spreadsheet formulas, basic statistics, visualization, and a practical project. If your goal is to perform entry-level analysis, these topics may be more useful than a course focused mainly on general business theory.

    Check whether the course includes:

    • Clearly defined learning outcomes.
    • Updated lessons and relevant examples.
    • Practical exercises and assignments.
    • Projects that demonstrate acquired skills.
    • Assessments that measure understanding.
    • Guidance for applying knowledge to real tasks.

    Avoid choosing a course simply because it contains a large number of lessons. More content does not automatically mean better learning. A focused program with clear objectives and meaningful practice may provide greater value than an extensive course with little structure.

    4. Check the Provider’s Credibility and Recognition

    Not every online course carries the same professional value. Some are offered by universities, established training organizations, industry associations, or recognized professional bodies. Others are independent programs designed primarily for personal learning.

    Research the organization delivering the course and the qualifications of its instructors. Look for relevant professional experience, subject expertise, transparent course information, and a clear explanation of how assessments work.

    You should also understand what the certificate represents. A certificate of completion usually confirms participation or successful completion of a course. A professional certification may require an examination, verified experience, or additional eligibility criteria.

    These credentials are not interchangeable.

    If your target profession requires a regulated qualification or a specific credential, confirm the requirements with the relevant employer, professional body, or licensing authority before enrolling. Do not assume that every online certificate will qualify you for professional practice.

    For other career goals, a credible course that develops demonstrable skills may be valuable even if it does not provide formal accreditation.

    5. Compare Course Costs and Overall Value

    Price is an important factor, but the cheapest course is not always the best investment. Likewise, a high price does not guarantee superior instruction or stronger career outcomes.

    Calculate the total cost before making a decision. Consider tuition, subscription fees, examination charges, required software, learning materials, and any additional expenses.

    Then compare the cost with the benefits you expect to receive. A course that teaches a specific skill needed for your target role may be more valuable than a cheaper program with little practical relevance.

    Review the payment terms carefully. Check whether the program offers a free trial, refund policy, installment options, or access to lessons after completion. Understand whether you must pay again to take an examination or obtain a certificate.

    You can compare options using a simple table:

    FactorWhat to consider
    Total costAll fees, tools, and examination expenses
    CurriculumRelevance to your career goals
    Practical workProjects, assignments, and real-world tasks
    CredentialRecognition and employer relevance
    SupportInstructor feedback and learner assistance
    FlexibilitySchedule, deadlines, and course access

    The best choice is the course that offers the strongest combination of relevance, quality, affordability, and practical value for your circumstances.

    6. Choose a Learning Format That Fits Your Schedule

    Online courses use different learning formats. Some are self-paced, allowing you to study whenever you have time. Others follow fixed schedules with live classes, deadlines, group discussions, or instructor-led sessions.

    Your preferred format should reflect your work commitments, family responsibilities, learning habits, and available study time.

    Self-paced learning may suit people who need flexibility or want to progress quickly through familiar topics. Instructor-led courses may be better for learners who benefit from regular feedback, structured deadlines, and interaction with classmates.

    Before enrolling, estimate how much time you can realistically dedicate each week. A demanding program may become difficult to finish if you consistently underestimate its workload.

    Check the course duration, lesson availability, deadline policy, technical requirements, and access period. If you are learning alongside a full-time job, a manageable schedule is often more useful than an ambitious plan that you cannot maintain.

    Consistency matters more than occasional long study sessions. Choose a format that allows you to make steady progress without creating unnecessary pressure.

    7. Look for Hands-On Projects and Practical Experience

    Employers often want evidence that candidates can apply their knowledge, not simply describe concepts learned in a course. Practical assignments help bridge the gap between understanding a topic and using it effectively.

    Look for courses that include case studies, simulations, portfolio projects, workplace scenarios, or realistic problem-solving activities.

    For example, a digital marketing course might ask learners to develop a campaign plan. A programming course could involve building a small application, while a project management course might require creating a timeline, identifying risks, and allocating resources.

    These projects can help you assess your progress and create examples of your abilities.

    Before enrolling, determine whether assignments receive feedback and whether you can retain completed work for your portfolio. If the course includes group projects, check how individual contributions are evaluated.

    When two programs cover similar topics, the one offering stronger opportunities to practice and demonstrate skills may be the better option.

    8. Read Reviews Without Relying on Ratings Alone

    Student reviews can provide useful information about teaching quality, course difficulty, technical problems, and instructor support. However, ratings should not be the only basis for your decision.

    Read a range of recent reviews and look for specific details rather than vague praise. Comments about outdated lessons, unclear explanations, missing feedback, or unexpected costs may reveal issues that a star rating cannot show.

    Also consider who wrote the review and what they wanted to achieve. A course that is excellent for beginners may be unsuitable for an experienced professional seeking advanced training.

    Check the publication or update date of the course material when possible. Industries such as software development, cybersecurity, digital marketing, and data analytics can change quickly, so outdated examples may reduce a course’s usefulness.

    Use reviews as one source of evidence alongside the curriculum, provider reputation, instructor qualifications, and learning outcomes.

    9. Confirm That the Course Matches Your Current Skill Level

    Choosing a program that is too advanced can lead to frustration, while a course that repeats what you already know may waste valuable time.

    Review the prerequisites and recommended experience. If the course assumes knowledge of particular tools, concepts, or terminology, make sure you understand those foundations before beginning.

    If you are new to a field, consider starting with an introductory course that establishes essential concepts. Once you have built confidence, progress to intermediate or specialized training.

    Experienced learners should look for advanced content, realistic projects, and opportunities to solve more complex problems.

    Some providers offer sample lessons, placement assessments, or diagnostic quizzes. Use these resources to judge whether the course is appropriate for your level.

    The goal is not to choose the most difficult program. It is to select one that challenges you appropriately and helps you develop the next set of skills required for your career.

    Common Mistakes to Avoid When Choosing an Online Course

    Even motivated learners can make poor enrollment decisions. Avoid these common mistakes:

    Choosing based on popularity alone: A widely advertised course may not address your specific learning needs.

    Ignoring the syllabus: Without reviewing the curriculum, you may discover that important topics are missing.

    Assuming every certificate is professionally recognized: Confirm the credential’s status and relevance before paying.

    Underestimating the time commitment: Consider your existing responsibilities and the actual weekly workload.

    Prioritizing theory over practice: Prefer courses that help you apply concepts through meaningful assignments or projects.

    Enrolling in too many courses at once: Completing one relevant program and applying its lessons may be more beneficial than starting several courses without finishing them.

    Making a deliberate decision before enrollment can help you protect your budget, maintain motivation, and improve the chances of completing your learning plan.

    A Quick Checklist Before You Enroll

    Use this checklist to compare your shortlisted courses:

    • The course supports a clearly defined career goal.
    • Its learning outcomes match skills I need to develop.
    • The curriculum is relevant and sufficiently up to date.
    • The provider and instructor have credible qualifications.
    • I understand the certificate or credential being offered.
    • The total cost fits my budget.
    • The format and schedule fit my routine.
    • The course includes useful practice or projects.
    • The prerequisites match my current skill level.
    • I have a plan for applying the skills after completion.

    If a course meets most of these criteria and addresses your most important skill gaps, it may be a strong candidate. Investigate any missing essentials before committing.

    Frequently Asked Questions

    How do I know if an online course is worth the money?

    Compare its curriculum, instructor expertise, practical assignments, credential value, and total cost. Consider whether the skills are relevant to your target role and whether you can demonstrate what you learn. A course is more likely to be worthwhile when its benefits align with a clear professional objective.

    Do employers value online courses?

    Many employers consider online learning useful evidence of initiative and professional development. However, the value depends on the role, course quality, credential recognition, and skills demonstrated. A certificate is generally stronger when supported by relevant projects, experience, or a portfolio.

    Is a free online course a good choice?

    A free course can be an excellent starting point for exploring a subject or learning foundational skills. Check its content quality, update date, exercises, and access conditions. If you later need advanced instruction, formal assessment, or a recognized credential, you may need a more specialized program.

    Should I choose a certificate course or a skills-based course?

    Choose according to your career objective. If an employer or professional body requires a particular credential, prioritize a course that meets that requirement. If your main goal is to improve performance or build a portfolio, practical training with relevant assignments may be more useful than a certificate alone.

    How many online courses should I take at once?

    There is no universal number, but focusing on one substantial course at a time can make it easier to complete assignments and apply what you learn. If you take multiple courses, make sure their workloads are manageable and their objectives complement one another.

    Conclusion

    Choosing the right online course for your career starts with understanding your goals and identifying the skills you need to develop. From there, compare curricula, instructor credibility, credential recognition, total costs, learning formats, and opportunities for practical experience.

    Avoid selecting a course solely because it is popular, inexpensive, or promises quick career advancement. Instead, look for a program that addresses a genuine skill gap and fits your schedule, budget, and current experience.

    The most effective approach to online learning is to connect education with action. Set a clear objective, complete relevant training, practice your new skills, and use projects or work experience to demonstrate your progress. With careful planning, an online course can become a practical step toward greater confidence, professional growth, and new career opportunities.

  • Academic Vocabulary Activities for English Learners

    Academic Vocabulary Activities for English Learners

    Academic vocabulary helps students understand lessons, participate in classroom discussions, read challenging texts, and express ideas clearly in writing. For English learners, learning these words can be particularly important because academic language often differs from the everyday English used in conversations.

    Students may understand a topic but struggle to explain it because they are unfamiliar with words such as analyze, compare, evidence, interpret, and summarize. Explicit vocabulary instruction gives learners the language they need to demonstrate what they know across subjects.

    Effective academic vocabulary activities for English learners go beyond memorizing definitions. They help students encounter words in context, connect new terms with familiar concepts, practice using them in meaningful situations, and revisit them over time. Teachers can support this process through collaborative games, visual organizers, reading tasks, speaking exercises, and structured writing activities.

    The following strategies can be adapted for elementary, middle school, high school, and adult English learners, depending on students’ language proficiency and educational needs.

    Why Is Academic Vocabulary Important for English Learners?

    Academic vocabulary includes words and expressions commonly used to explain concepts, evaluate information, compare ideas, and complete school assignments. Some terms appear across many subjects, while others are specific to disciplines such as mathematics, science, history, or literature.

    For example, students may encounter the word evaluate in a science investigation, a history assignment, and a literary analysis. Although the subject matter changes, the word generally asks students to make a judgment based on criteria or evidence.

    A strong academic vocabulary supports several essential learning skills:

    • Reading comprehension: Students can understand instructions, textbooks, and academic passages more effectively.
    • Classroom participation: Learners can ask questions, explain ideas, and contribute to discussions.
    • Academic writing: Students can organize arguments and communicate relationships between ideas.
    • Critical thinking: Words such as infer, justify, and interpret help students describe complex thinking.
    • Independent learning: Familiarity with academic terms makes unfamiliar assignments easier to approach.

    Teachers should also recognize that English learners may already understand a concept in another language. Connecting new English vocabulary to existing knowledge can make learning more efficient and affirm students’ linguistic strengths.

    1. Create Academic Vocabulary Word Maps

    Word maps help students explore a word beyond its basic definition. They can include meaning, examples, related words, common phrases, and visual representations.

    This activity is especially useful when learners need to understand abstract academic terms.

    How to conduct the activity

    Choose a word students will encounter in an upcoming lesson, such as evidence. Draw a large word map with sections for:

    • The word and its meaning.
    • A simple example.
    • A picture or symbol.
    • Related words or phrases.
    • A sentence using the word correctly.

    For evidence, students might write, “Information that supports or helps establish a claim.” An example could be a set of measurements supporting a scientific conclusion.

    Ask students to share their maps with a partner and explain which examples helped them understand the word. For advanced learners, include non-examples and ask them to explain why those examples do not fit.

    Why it works: Students connect meaning, context, and usage instead of learning a definition in isolation.

    Teaching tip: Keep word maps available in notebooks or classroom displays so learners can revisit them during reading and writing tasks.

    2. Teach Context Clues Through Short Reading Passages

    Context clues help students infer the meaning of unfamiliar words by examining surrounding sentences. This skill is particularly valuable when learners encounter academic vocabulary in textbooks or assessments.

    How to conduct the activity

    Select a short passage that includes two or three target words. Choose passages that are challenging enough to introduce new vocabulary but accessible enough for students to understand the overall meaning.

    For example:

    “The class collected measurements from three experiments. The results were consistent, meaning that the findings were similar across repeated trials.”

    Ask students to infer the meaning of consistent using the explanation provided in the sentence.

    Teach learners to look for several types of clues:

    • Definitions or explanations within a sentence.
    • Examples that clarify an unfamiliar term.
    • Contrasts that reveal how two ideas differ.
    • Cause-and-effect relationships that help establish meaning.

    Have students underline the clues they used and explain their reasoning. Then ask them to check their interpretation against a dictionary or classroom glossary.

    Why it works: Students develop independent reading strategies rather than relying on translations or teacher explanations for every unfamiliar word.

    Teaching tip: Explain that context clues do not always provide a complete definition. Students should verify important or ambiguous meanings before using a word in academic work.

    3. Use Vocabulary Sorting and Categorization Games

    Sorting activities help learners recognize relationships among words. Students can organize vocabulary according to meaning, function, subject area, or how terms are used in sentences.

    These games are useful for reviewing vocabulary while encouraging students to explain their thinking.

    How to conduct the activity

    Prepare cards containing academic words, simple definitions, and example sentences. Choose a manageable group of terms, such as compare, contrast, analyze, summarize, describe, and evaluate.

    Ask students to place words into categories. Possible categories include:

    • Words used to explain similarities and differences.
    • Words used to examine information.
    • Words used to present a brief account.
    • Words used to make a judgment.

    Some terms may fit more than one category depending on their use. Encourage students to defend their choices instead of treating every disagreement as an error.

    For a more challenging version, give students the words without category labels and ask them to invent appropriate categories.

    Why it works: Students build semantic connections and learn that academic words perform different functions in classroom tasks.

    Teaching tip: Require students to use each word in a short sentence after sorting it. This helps connect recognition with productive language use.

    4. Practice Academic Vocabulary With Sentence Frames

    English learners may understand a word but struggle to use it in a complete academic sentence. Sentence frames provide a structure that helps students communicate ideas while developing independence.

    How to conduct the activity

    Choose a small set of target words and prepare sentence frames connected to the current lesson.

    For example:

    • “The evidence suggests that ___ because ___.”
    • “One similarity between ___ and ___ is ___.”
    • “The results demonstrate ___ because ___.”
    • “I interpret the information to mean ___.”

    Students complete the frames using information from a reading, experiment, class discussion, or historical source.

    At first, provide a word bank and model an example. Later, remove some of the support and ask students to construct their own sentences.

    For a collaborative variation, students exchange sentences and identify whether the target word is used accurately.

    Why it works: Sentence frames reduce the difficulty of organizing academic language while students focus on meaning and content.

    Teaching tip: Gradually reduce sentence support as students gain confidence. Frames should serve as temporary scaffolds, not permanent limits on expression.

    5. Play Academic Vocabulary Charades or Pictionary

    Movement and visual representation can make abstract words more memorable. Charades and drawing games are particularly useful for reinforcing vocabulary students have already encountered.

    How to conduct the activity

    Write familiar academic terms on cards. Students take turns drawing a card and representing the word through gestures or a picture while classmates guess the term.

    Suitable words might include classify, observe, predict, compare, measure, and investigate.

    After a correct guess, ask the class to explain the word and provide an example from a subject they study.

    For instance, a student might draw two objects side by side to represent compare. The class can then produce a sentence explaining what the objects have in common.

    Why it works: Students connect vocabulary with visual and physical representations, making review more interactive.

    Teaching tip: Some academic words are difficult to represent visually. For abstract terms, allow students to use a simple scenario or short explanation rather than insisting on a perfect drawing or gesture.

    6. Build Vocabulary Through Collaborative Discussions

    Students need opportunities to hear academic vocabulary in context and use it when communicating with others. Structured discussions can create those opportunities while helping English learners practice speaking and listening.

    How to conduct the activity

    Present a short question related to a current lesson. For example, in a science class, ask students to explain which evidence best supports a hypothesis.

    Provide a small set of target words, such as evidence, support, conclude, and interpret. Give students a moment to prepare their ideas before discussing them in pairs or small groups.

    Assign discussion roles if helpful. One student might explain the evidence, another might ask a follow-up question, and a third might summarize the group’s conclusion.

    Encourage students to build on one another’s ideas using phrases such as “I agree because…” or “An alternative interpretation is…”

    Why it works: Students practice vocabulary as a tool for expressing ideas rather than as an isolated language exercise.

    Teaching tip: Allow brief planning time and provide discussion prompts. Avoid correcting every language error during the conversation; focus first on meaning and participation, then address selected language patterns.

    7. Create a Personal Academic Vocabulary Journal

    A vocabulary journal gives students a record of new words and helps them review learning over time. Unlike a simple list of definitions, an effective journal captures how a word is used and how the student’s understanding develops.

    How to conduct the activity

    Ask students to record a few important words from each lesson. For every word, they should include:

    1. The word and its part of speech, when useful.
    2. A student-friendly definition.
    3. An example from the lesson.
    4. An original sentence.
    5. Related words or common word forms.

    For example, the entry for analyze might include analysis and analytical. Students can also note common phrases, such as “analyze the results” or “analyze the argument.”

    At the end of the week, ask learners to choose two words and explain how they used them in reading, discussion, or writing.

    Why it works: Regular review supports retention and helps students recognize connections between related forms and uses.

    Teaching tip: Encourage selective vocabulary recording rather than copying every unfamiliar word. Prioritize terms that appear repeatedly or are essential for understanding the subject.

    8. Use Vocabulary in Short Writing Challenges

    Writing activities encourage students to retrieve vocabulary from memory and use words accurately in meaningful contexts. Short tasks are often more manageable than full essays, particularly for learners who are still developing academic English.

    How to conduct the activity

    Choose three to five target words from a recent lesson. Ask students to write a paragraph that uses the words correctly to explain a concept, compare two ideas, or summarize a reading.

    For example, students studying environmental science might use factor, impact, evidence, and conclusion to explain how a particular change affects an ecosystem.

    After writing, ask students to underline the target words and check whether each word fits the sentence. Partners can review the paragraph using a simple checklist:

    • Does the sentence communicate a clear idea?
    • Is the target word used accurately?
    • Does the example fit the meaning?
    • Could the sentence be clearer or more precise?

    Why it works: Students move from recognizing vocabulary to producing it independently, which is an important part of academic language development.

    Teaching tip: Assess word meaning and appropriate use separately from grammar and spelling when the primary learning objective is vocabulary.

    How to Choose the Right Vocabulary Activities

    The most effective activity depends on students’ proficiency, the vocabulary being taught, and the demands of the lesson.

    Student needUseful activity
    Understanding new word meaningsWord maps and context clues
    Recognizing relationships between termsSorting and categorization
    Producing complete academic sentencesSentence frames
    Reviewing familiar vocabularyCharades and Pictionary
    Practicing spoken academic languageCollaborative discussions
    Retaining words over timeVocabulary journals
    Applying vocabulary independentlyShort writing challenges

    For beginners, use concrete examples, visuals, gestures, and a smaller number of target words. Intermediate learners may benefit from context clues, structured discussions, and paragraph writing. Advanced learners can examine shades of meaning, discipline-specific terminology, and differences in how words are used across contexts.

    These are flexible guidelines, not fixed categories. Students may need different levels of support for speaking, reading, and writing.

    How to Assess Academic Vocabulary Progress

    Vocabulary assessment should examine more than whether students can match words with definitions. Learners also need to understand words in context and use them appropriately.

    Teachers can combine several methods:

    • Quick exit tickets: Ask students to explain a target word or use it in a new sentence.
    • Context-based questions: Give students a short passage and ask them to interpret an unfamiliar term.
    • Speaking observations: Listen for accurate vocabulary during discussions and presentations.
    • Writing samples: Check whether students use target words appropriately in explanations and arguments.
    • Periodic review: Revisit important terms after several days or weeks to see whether students retain them.

    A simple assessment rubric can focus on meaning, context, accuracy, and independence. Students should also have opportunities to revise their work after receiving feedback.

    Common Mistakes to Avoid When Teaching Academic Vocabulary

    Teaching too many words at once: A long list can overwhelm learners. Introduce a manageable set of high-value terms and revisit them in different contexts.

    Relying only on memorization: Definitions matter, but students also need examples, discussion, reading, and writing opportunities.

    Ignoring word forms and collocations: Understanding analyze may not automatically help a student use analysis or recognize the phrase “analyze the data.” Teach related forms when relevant.

    Correcting every language error immediately: Constant interruption can discourage participation. Choose feedback that supports the lesson’s main goal and give students time to express their ideas.

    Using vocabulary outside meaningful contexts: Words become easier to understand when students see how they function in real texts, academic tasks, and discussions.

    Frequently Asked Questions

    What is academic vocabulary for English learners?

    Academic vocabulary consists of words and phrases used to understand instruction, discuss ideas, read educational texts, and complete academic tasks. Examples include analyze, compare, interpret, evidence, and summarize.

    How many new academic words should students learn at a time?

    The appropriate number depends on learners’ age, proficiency, and the difficulty of the terms. A small group of important words that students can practice repeatedly is often more useful than a long list introduced in one lesson.

    How can teachers help English learners remember academic vocabulary?

    Teachers can combine visual word maps, contextual reading, speaking practice, vocabulary journals, and short writing tasks. Repeated encounters across several days and subjects help students strengthen their understanding.

    Should academic vocabulary be taught separately from content lessons?

    Explicit instruction is helpful, but vocabulary is often easier to understand when connected to meaningful content. Teachers can introduce a word directly and then reinforce it through reading, discussion, experiments, and writing.

    Conclusion

    Academic vocabulary helps English learners participate more confidently in classroom learning and communicate complex ideas across subjects. Building this vocabulary requires more than memorizing definitions. Students need to encounter words in context, connect them to familiar concepts, and practice using them in speaking and writing.

    These academic vocabulary activities for English learners give teachers practical ways to make vocabulary instruction interactive, purposeful, and adaptable to different proficiency levels. Word maps, context clues, collaborative discussions, sentence frames, and short writing tasks can all contribute to stronger academic language skills.

    The key is consistency. Introduce important words, model their use, provide opportunities for practice, and revisit them over time. With meaningful support and regular opportunities to apply new vocabulary, English learners can develop the language skills needed for greater academic independence.

  • Easy Science Experiments for Middle School Students

    Easy Science Experiments for Middle School Students

    Science becomes more engaging when students can test ideas, observe results, and discover how the world works for themselves. Instead of learning scientific concepts only from textbooks, middle school students can explore chemistry, physics, biology, and earth science through simple hands-on experiments.

    The best easy science experiments for middle school use accessible materials, provide clear instructions, and encourage students to ask questions. Activities such as testing water filtration, investigating surface tension, building paper bridges, and observing plant growth help learners connect scientific concepts with everyday experiences.

    These experiments are suitable for classroom demonstrations, science lessons, supervised home activities, and school science fairs. Each activity offers an opportunity to make a prediction, collect evidence, and explain the results using scientific reasoning.

    Why Are Hands-On Science Experiments Important?

    Middle school is an important stage for developing scientific thinking. Students begin moving beyond simple observations toward explanations involving variables, evidence, and cause-and-effect relationships.

    Hands-on experiments allow students to apply the scientific method in a practical setting. They can ask a question, form a hypothesis, test an idea, record observations, and decide whether the evidence supports their prediction.

    These activities can help students develop several essential skills:

    • Critical thinking: Students compare predictions with actual results.
    • Problem-solving: They investigate unexpected outcomes and consider possible explanations.
    • Observation: They record changes in color, temperature, movement, or other measurable features.
    • Data analysis: They organize measurements in tables or graphs.
    • Collaboration: They share responsibilities and discuss findings with classmates.

    Experiments do not need expensive equipment to be educational. Simple materials can produce meaningful learning when students understand the question being investigated and record their results carefully.

    1. Investigate Surface Tension With Water and Pepper

    This experiment demonstrates surface tension and shows how soap can change the behavior of water at its surface.

    Materials needed:

    • A shallow plate
    • Water
    • Ground black pepper
    • Liquid dish soap
    • A cotton swab

    Steps:

    1. Pour a shallow layer of water into the plate.
    2. Sprinkle a small amount of pepper evenly across the water’s surface.
    3. Observe how the pepper is distributed.
    4. Dip the cotton swab into a small amount of dish soap.
    5. Gently touch the soapy swab to the center of the water.
    6. Record what happens to the pepper.

    What happens and why?

    The pepper usually moves quickly away from the point where the soapy swab touches the water. Water molecules attract one another, creating surface tension. Soap changes the surface properties of water, creating a difference in surface tension that drives the visible movement.

    The pepper is carried along by the movement of the water’s surface. It does not mean the pepper itself is repelled by a mysterious force.

    Scientific concepts: Surface tension, molecular interactions, and observation.

    Extension activity: Repeat the experiment with clean water and compare the results with water containing a small amount of soap. Ask students to explain why the two conditions differ.

    2. Build a Paper Bridge and Test Its Strength

    A paper bridge demonstrates how shape and structure influence the strength of a material. Students can investigate engineering principles while practicing fair testing.

    Materials needed:

    • Several sheets of identical paper
    • Two stacks of books
    • Small coins or identical counters
    • A ruler

    Steps:

    1. Place the two stacks of books a short distance apart to create a gap.
    2. Lay one flat sheet of paper across the gap.
    3. Add coins one at a time to the center of the paper until it bends too much or can no longer support the load.
    4. Record the number of coins supported.
    5. Repeat the test using paper folded into an accordion shape.
    6. Compare the results, keeping the paper type, gap, and loading method consistent.

    What happens and why?

    The flat paper may bend under a relatively small load. Folding the paper changes its geometry and increases its resistance to bending in this arrangement. The folded bridge may therefore support more coins.

    The result depends on the paper, fold spacing, bridge span, and placement of the load. Students should use repeated trials rather than assuming one test proves which design is always strongest.

    Scientific concepts: Forces, structural engineering, and material strength.

    Extension activity: Challenge students to design a bridge that supports the greatest number of coins while using only one sheet of paper. Have each group explain the design choices behind its results.

    3. Explore Density With Saltwater and Freshwater

    Density describes how much mass is contained in a given volume. This experiment helps students investigate how dissolved salt affects water density and how density differences influence floating objects.

    Materials needed:

    • Two clear glasses
    • Water
    • Table salt
    • A spoon
    • Two similar-sized eggs, if available
    • A tray to catch spills

    Steps:

    1. Fill both glasses with approximately equal amounts of water.
    2. Leave the first glass as fresh water.
    3. Add several spoonfuls of salt to the second glass and stir until the salt dissolves. Add more if necessary.
    4. Carefully place an egg into each glass.
    5. Observe whether the eggs sink or float.
    6. Record the differences and discuss possible explanations.

    What happens and why?

    An egg may sink in fresh water but float in sufficiently salty water. Dissolved salt increases the water’s density. When the surrounding liquid is dense enough, the upward buoyant force can support the egg.

    The exact result depends on the egg’s density and the amount of salt dissolved. Students should not assume that every egg will behave identically.

    Scientific concepts: Density, mass, volume, and buoyancy.

    Extension activity: Prepare saltwater solutions with different amounts of salt. Compare how much salt is needed before the egg begins to float, using the same egg and water volume where practical.

    4. Make a Simple Water Filter

    Water filtration is a useful way to explore environmental science and engineering. Students can construct a basic filter and observe how different materials affect the appearance of muddy water.

    Materials needed:

    • A clean, transparent plastic bottle prepared by an adult
    • Coffee filter or clean cotton
    • Clean sand
    • Small gravel
    • Muddy water made from soil and tap water
    • A collection container

    Steps:

    1. Ask an adult to prepare the bottle safely by cutting it if necessary.
    2. Place the filter material near the bottle’s neck.
    3. Add layers of clean sand and gravel.
    4. Position the bottle over the collection container.
    5. Slowly pour the muddy water through the filter.
    6. Compare the filtered water with the original sample and record visible differences.

    What happens and why?

    The filter may remove some suspended particles, making the water appear clearer. Different layers trap particles of different sizes, while the filter material helps prevent sand and gravel from escaping into the collection container.

    However, clear-looking water is not necessarily safe to drink. This simple filter does not reliably remove harmful microorganisms, dissolved chemicals, or all contaminants.

    Scientific concepts: Filtration, particle size, water quality, and environmental engineering.

    Extension activity: Compare two filter designs and measure how much visible sediment remains after each trial. Students can also compare filtration speed, while keeping the amount of water consistent.

    5. Observe Plant Growth Under Different Conditions

    Plants need suitable environmental conditions to grow. This experiment helps students investigate how light affects the growth of young seedlings.

    Materials needed:

    • Fast-growing seeds, such as bean seeds
    • Three small containers
    • Potting soil
    • Water
    • A ruler
    • Labels

    Steps:

    1. Fill the three containers with equal amounts of soil.
    2. Plant the same number of seeds at the same depth in each container.
    3. Water each container with the same amount of water.
    4. Place one container in a suitable bright location and the others in different light conditions.
    5. Keep other conditions as similar as possible.
    6. Measure the seedlings regularly and record their appearance.

    Avoid placing growing plants in conditions that create excessive heat or otherwise damage them. A dark-condition comparison should be brief and supervised.

    What happens and why?

    Seedlings may grow differently depending on light exposure. Plants use light for photosynthesis, the process by which they convert light energy into chemical energy. Seedlings grown with very little light may become pale and elongated as they respond to the lack of light.

    Height alone does not tell the full story. Students should also observe leaf color, stem strength, and overall plant health.

    Scientific concepts: Photosynthesis, plant development, and experimental variables.

    Extension activity: Have students graph plant height over time. Discuss why a fair test requires consistent soil, seed type, water, and measurement methods.

    6. Investigate Chemical Reactions With Baking Soda and Vinegar

    A baking soda and vinegar reaction offers a visible introduction to chemical change and gas production. It can help students connect observations with evidence of a reaction.

    Materials needed:

    • Baking soda
    • Vinegar
    • A small, open container
    • A measuring spoon
    • A tray

    Steps:

    1. Place the container on the tray.
    2. Add a small measured amount of vinegar.
    3. Add a small amount of baking soda.
    4. Observe the bubbles and foam that form.
    5. Record how long the visible bubbling continues.
    6. Repeat with different measured amounts while keeping the container and other conditions consistent.

    What happens and why?

    Baking soda reacts with acetic acid in vinegar, producing carbon dioxide gas, water, and a dissolved compound called sodium acetate. The bubbles are evidence of gas formation during the reaction.

    Students should avoid sealing the mixture in a rigid container because gas buildup can create pressure.

    Scientific concepts: Chemical reactions, acids, bases, and gas production.

    Extension activity: Compare the reaction when different amounts of baking soda are used. Ask students to distinguish what they observe from what they infer about the reaction.

    7. Test How Insulation Affects Temperature

    Insulation slows the transfer of thermal energy between an object and its surroundings. Students can investigate this principle using containers wrapped in different materials.

    Materials needed:

    • Two or three identical cups
    • Warm tap water
    • Thermometer
    • Materials such as cloth, paper, or bubble wrap
    • Timer

    Steps:

    1. Label each cup and leave one unwrapped as a control.
    2. Wrap the other cups in different insulating materials.
    3. Pour equal amounts of warm tap water into each cup.
    4. Measure and record the starting temperature.
    5. Measure the temperature at regular intervals, such as every five minutes.
    6. Compare the temperature changes over the same period.

    Use warm tap water rather than boiling water, and follow classroom safety procedures for handling it.

    What happens and why?

    The cups may cool at different rates because the materials affect heat transfer. The best-performing material depends on its properties, thickness, fit, and the conditions of the experiment.

    Students should compare temperature changes rather than judging insulation based on how a material feels to the touch.

    Scientific concepts: Thermal energy, heat transfer, and insulation.

    Extension activity: Graph temperature against time for each cup. Ask students to explain which material slowed cooling most effectively and whether the results were consistent across trials.

    8. Create a Simple Static Electricity Experiment

    Static electricity demonstrates how electric charges can cause objects to attract one another. This experiment uses an ordinary balloon to produce a visible effect.

    Materials needed:

    • One balloon
    • Small pieces of dry paper
    • A wool or synthetic fabric
    • A clean, dry surface

    Steps:

    1. Inflate the balloon and tie it securely.
    2. Cut or tear paper into small pieces.
    3. Rub the balloon against the fabric for several seconds.
    4. Bring the balloon close to the paper pieces without touching them.
    5. Observe whether the pieces move toward the balloon.
    6. Repeat the experiment after allowing the balloon to sit for a short time.

    What happens and why?

    Rubbing the balloon against the fabric can transfer electric charge between the materials. The charged balloon can attract nearby paper through the electric forces acting on charges within the paper.

    Humidity, material type, and the amount of rubbing can affect the result.

    Scientific concepts: Electric charge, electrostatic forces, and attraction.

    Extension activity: Compare the balloon’s effect before and after rubbing. Ask students to explain why the attraction changes and why the result may vary in humid conditions.

    How to Make Science Experiments More Educational

    A successful experiment involves more than following instructions. Students should understand the question being investigated and use evidence to support their explanations.

    Teachers can improve learning by following a consistent process.

    1. Start with a testable question

    A useful question can be investigated through observation or measurement. For example, “Which paper bridge design supports the most coins?” is more testable than “What is the best bridge?”

    2. Ask students to make a prediction

    Before starting, students should write what they expect to happen and explain why. Predictions help reveal their existing understanding and provide something to compare with the results.

    3. Identify variables

    Explain which factor is being changed, what outcome is being measured, and which conditions should remain consistent. This is particularly important when comparing materials or testing different amounts of a substance.

    4. Record observations

    Students can use tables, drawings, photographs, or graphs to document what happens. Encourage them to record actual observations rather than changing results to match their predictions.

    5. Discuss unexpected results

    An unexpected outcome is an opportunity to investigate possible explanations. Students can check their procedure, repeat the test, or consider whether an uncontrolled variable affected the results.

    Science Experiment Safety Tips for Middle School Students

    Even simple classroom experiments require appropriate supervision and preparation.

    • Follow the teacher’s instructions and use protective equipment when required.
    • Never taste experimental materials or drink water used in a laboratory activity.
    • Use only small, appropriate quantities of household materials.
    • Have an adult handle sharp tools, including bottle-cutting equipment.
    • Avoid mixing cleaning products or unknown chemicals.
    • Do not seal gas-producing reactions in rigid containers.
    • Use warm rather than boiling water for temperature experiments.
    • Wash hands and clean the work area after each activity.

    Teachers should review allergies, material hazards, and school safety requirements before beginning an experiment. If an activity is not appropriate for the available setting, use a demonstration or choose a safer alternative.

    Frequently Asked Questions

    What are the easiest science experiments for middle school students?

    Simple options include the water-and-pepper surface tension experiment, paper bridge testing, density investigations with saltwater, plant growth observations, and baking soda and vinegar reactions. The best choice depends on the learning objective and available materials.

    How can students make a science experiment successful?

    Students should begin with a clear question, make a prediction, follow a consistent procedure, record observations, and explain their results using evidence. Repeating trials can help determine whether an outcome is reliable.

    Can these experiments be completed at home?

    Many can be performed at home with adult supervision and common household materials. Experiments involving cutting tools, warm water, or chemical reactions require additional care and should follow appropriate safety instructions.

    Which science experiments are suitable for a school science fair?

    Paper bridge strength tests, plant growth comparisons, insulation investigations, and water filtration comparisons can make useful science fair projects. Students should define a testable question, collect data across multiple trials, and explain the limitations of their results.

    Conclusion

    Easy science experiments give middle school students opportunities to investigate the world through observation, testing, and evidence-based reasoning. From exploring surface tension and density to building paper bridges and examining insulation, these activities introduce important scientific ideas without requiring expensive equipment.

    The most valuable part of an experiment is not simply the final result. Students benefit when they make predictions, control variables, collect measurements, and explain why their observations occurred.

    By incorporating easy science experiments for middle school into regular lessons, teachers can make science more interactive and help students develop curiosity, critical thinking, and practical problem-solving skills. With clear instructions and appropriate safety precautions, everyday materials can become the starting point for meaningful scientific discovery.

  • Beginner Coding Activities for Kids

    Beginner Coding Activities for Kids

    Coding can help children develop problem-solving skills, creativity, logical thinking, and confidence with technology. However, introducing programming to beginners does not have to involve complicated software or long lessons. Children can start by following simple instructions, solving puzzles, building patterns, and creating small interactive projects.

    The best coding activities for beginners kids can enjoy are playful, hands-on, and appropriate for their age and experience. Some activities use paper, cards, or everyday objects, while others introduce children to visual programming tools and basic computer code. Both approaches help young learners understand how instructions work and how technology follows a sequence of commands.

    Whether you are a parent looking for educational activities at home or a teacher planning a classroom lesson, these beginner-friendly ideas can make coding more approachable. With short sessions and plenty of room for experimentation, children can learn essential programming concepts while having fun.

    Why Should Kids Learn Coding?

    Coding is the process of creating instructions that tell a computer or digital device what to do. When children learn to code, they practice breaking large tasks into smaller steps, identifying patterns, testing ideas, and correcting mistakes.

    These skills are useful beyond computer science. A child who learns to organize instructions for a simple game is also practicing planning and logical reasoning.

    Beginner coding activities can help children develop:

    • Problem-solving skills: Children learn to identify a challenge and test possible solutions.
    • Logical thinking: They practice arranging instructions in a meaningful order.
    • Creativity: They can design stories, games, animations, and interactive experiences.
    • Persistence: They discover that mistakes are opportunities to improve a project.
    • Collaboration: Group activities encourage children to share ideas and explain their thinking.

    Children do not need advanced mathematics or previous programming experience to begin. The right activity should match their developmental stage, interests, and ability to follow instructions.

    1. Play the Human Robot Game

    The human robot game introduces one of the most important coding concepts: a computer follows specific instructions. It also demonstrates why instructions must be clear and precise.

    How to play

    Choose one child to act as a robot and another to act as the programmer. Place a toy, book, or other safe object a short distance away. The programmer must guide the robot toward the object using simple commands such as:

    • Move forward one step.
    • Turn left.
    • Turn right.
    • Stop.

    The robot should follow each command exactly as given. If the programmer says something unclear, such as “go over there,” the robot can ask for a more precise instruction.

    After the first attempt, switch roles so every child experiences both activities.

    For an additional challenge, create a simple obstacle course using cushions or paper markers. Children must plan a sequence of movements that reaches the destination without hitting an obstacle.

    What kids learn: Sequencing, clear instructions, algorithms, and debugging.

    This activity is especially useful for younger children because it introduces programming without requiring a screen, keyboard, or reading-heavy instructions.

    2. Create an Algorithm With Picture Cards

    An algorithm is a set of ordered steps used to complete a task. Children already follow algorithms in everyday life when they brush their teeth, prepare a school bag, or follow a recipe.

    This activity helps them recognize that familiar routines can be represented as instructions.

    How to play

    Prepare picture cards showing the steps of a simple activity, such as planting a seed, washing hands, or getting ready for school. Mix up the cards and ask children to arrange them in the correct order.

    Next, ask them to explain why the sequence matters. For example, watering a plant before placing the seed in the soil may not be the intended order for the particular task.

    For older children, introduce an unexpected change. Ask them to add a step, remove an unnecessary step, or rearrange the instructions to improve the process.

    What kids learn: Algorithms, sequencing, organization, and logical reasoning.

    Teachers can turn this activity into a group challenge by asking students to create their own picture cards for a familiar routine and exchange them with classmates.

    3. Solve a Coding Maze

    A coding maze combines movement, planning, and problem-solving. It encourages children to think ahead instead of making random moves until they reach the destination.

    How to play

    Draw a grid on paper or use floor tiles to create a simple maze. Place a starting marker at one end and a target, such as a toy or picture, at the other.

    Give children direction cards representing moves forward, left, and right. Ask them to arrange the cards into a sequence that guides a character through the maze.

    Before moving the character, children should predict where each command will take it. If the sequence fails, they can inspect the instructions, find the problem, and try again.

    As children improve, introduce additional challenges:

    • Add obstacles that must be avoided.
    • Create a shorter route to the target.
    • Increase the size of the maze.
    • Ask children to explain why their solution works.

    What kids learn: Algorithms, spatial reasoning, planning, and debugging.

    Keep the first maze simple enough that children can succeed after a few attempts. The goal is to encourage experimentation rather than make the activity feel like a difficult test.

    4. Learn Patterns With Binary Beads

    Computers represent information using binary digits, commonly called bits. A bit can have one of two values: 0 or 1. Younger children do not need to understand the technical details immediately, but they can explore the idea of representing information with two different choices.

    How to play

    Give children two colors of beads, paper squares, or blocks. Assign one color to 0 and the other to 1. Ask them to create patterns using a fixed number of pieces.

    For example, with three positions, children can explore combinations such as 000, 001, 010, and 111. Explain that each position can contain either of the two choices.

    Older children can investigate how the number of possible patterns changes as they add more positions. They can also create a simple color code to represent letters or symbols, provided the class agrees on the rules first.

    Use large, safe materials for young children who may put small objects in their mouths.

    What kids learn: Patterns, representation, logical thinking, and an introductory understanding of binary information.

    The activity should remain hands-on and visual rather than turning into a lesson filled with technical terminology.

    5. Make a Story With Block-Based Coding

    Visual programming tools allow children to create programs by connecting blocks that represent commands. Instead of memorizing programming syntax, beginners can focus on how instructions fit together.

    A simple animated story is an excellent first project because children can combine characters, movement, dialogue, and backgrounds.

    How to create the project

    Ask children to plan a short story with a beginning, middle, and ending. They might create a character who walks across a screen, meets a friend, and shares a message.

    Have them select a character and background, then connect basic commands to control movement or display dialogue. They can run the project, observe what happens, and adjust the instructions when the result differs from their plan.

    Encourage children to add one new feature at a time. For example, they could make the character change position, wait before speaking, or play a sound when another character appears.

    What kids learn: Events, sequences, creative design, and basic programming logic.

    Choose an age-appropriate tool with a simple interface, and review its privacy settings before children create accounts or share projects online.

    6. Design a Simple Interactive Quiz

    An interactive quiz introduces children to the idea that a program can respond differently depending on what a user does.

    The project can be based on a favorite animal, a school subject, basic mathematics, or general knowledge.

    How to build it

    Start by writing three simple questions and their correct answers. Ask children to decide what should happen when someone selects the right answer and what should happen when the answer is incorrect.

    In a block-based programming environment, students can use input, conditions, and feedback messages to build the quiz. A correct answer might display “Great job!” while an incorrect answer could offer a hint.

    For children who are not ready to use software, the same idea can be demonstrated with paper cards and a partner acting as the program.

    Once the basic quiz works, students can add a score counter, another question, or a final results screen.

    What kids learn: Conditional logic, input and output, testing, and user experience.

    This activity also encourages children to think about how software communicates with the person using it.

    7. Create a Digital Drawing or Animation

    Digital art offers a creative introduction to programming for children who enjoy drawing, storytelling, or design. Instead of beginning with a complex game, students can create a picture that changes when a command runs.

    How to create the project

    Ask children to choose a theme, such as outer space, a garden, or an underwater world. They can draw or select a background and add several objects.

    Next, introduce a simple action. One object might move across the screen, another might change size, or a character might appear after a button is pressed.

    Encourage students to test each action and observe whether the program behaves as expected. They can then combine several commands into a short animation.

    For a collaborative classroom project, each student can design one scene and explain how its commands work.

    What kids learn: Events, sequencing, creative problem-solving, and iterative design.

    Let children personalize their projects. A sense of ownership can make the process more engaging and encourage them to experiment with new ideas.

    8. Build a Simple Game With Rules

    After children understand sequences and basic events, they can begin creating a simple game. A beginner project might involve moving a character toward a target, collecting objects, or avoiding an obstacle.

    The most important part is to begin with a small, achievable goal rather than attempting a complicated game immediately.

    How to create the project

    First, ask children to describe the game in one or two sentences. Define what the player can do, what counts as success, and what happens when the game ends.

    Next, build the essential features. For example, a character might move when an arrow key is pressed, and the player might earn a point when the character touches a target.

    Test the game several times. Ask children to identify confusing controls, unexpected behavior, or situations where the game does not respond correctly.

    After the basic version works, students can add a timer, additional targets, or a new level.

    What kids learn: Events, conditions, testing, game design, and debugging.

    Celebrate a working first version before adding more features. Finishing a small project can build confidence and prepare children for more advanced programming.

    Tips for Choosing Coding Activities by Age

    Children learn at different rates, so age should be treated as a general guide rather than a strict rule.

    • Ages 4–6: Begin with movement games, picture-card algorithms, simple patterns, and short activities with adult guidance.
    • Ages 7–9: Introduce coding mazes, step-by-step challenges, simple visual programming, and interactive stories.
    • Ages 10–12: Explore quizzes, animations, game mechanics, conditions, and more complex debugging challenges.
    • Ages 13 and older: Offer opportunities to experiment with block-based programming, introductory text-based code, and projects connected to personal interests.

    Keep sessions manageable and provide breaks when children lose focus. Some learners may prefer building physical models, while others enjoy creating digital stories or games.

    Common Mistakes to Avoid When Teaching Coding

    Starting with complicated code: Too many new concepts can discourage beginners. Begin with one clear goal and introduce additional features gradually.

    Focusing only on the final result: Children learn through testing, revising, and explaining their decisions. The process matters as much as a finished project.

    Treating errors as failure: A program that does not work as expected provides an opportunity to practice debugging. Encourage children to change one thing at a time and test again.

    Choosing activities that are too difficult: Adjust the instructions, materials, and level of independence to match each child’s needs.

    Spending too much time on screens: Unplugged activities can teach essential programming ideas without requiring a computer. A balanced mix of physical and digital tasks can make lessons more accessible.

    Frequently Asked Questions

    What is the best age for kids to start coding?

    Children can begin exploring coding concepts in early childhood through games, movement, patterns, and simple instructions. More structured programming can be introduced when children are ready to follow the relevant steps and understand the activity.

    Can kids learn coding without a computer?

    Yes. Human robot games, coding mazes, picture-card algorithms, and pattern activities introduce programming concepts using everyday materials. These activities can prepare children for digital programming later.

    How long should a beginner coding activity take?

    Many beginners benefit from short sessions of around 15 to 30 minutes, depending on their age, attention span, and the complexity of the task. Some projects may require several sessions.

    Do children need mathematics skills to learn coding?

    Basic counting and logical reasoning are useful, but beginners do not need advanced mathematics. Children can start with simple sequences and gradually explore more complex concepts as their skills develop.

    Conclusion

    Learning to code can be an enjoyable way for children to explore technology, express creativity, and develop problem-solving skills. The most effective beginner activities provide clear goals, manageable challenges, and opportunities to experiment without fear of making mistakes.

    From human robot games and coding mazes to interactive quizzes, animations, and simple games, these coding activities for beginners kids can try offer multiple ways to discover programming. Parents and teachers can choose activities based on children’s ages, interests, and available resources.

    Start with one simple project, celebrate progress, and encourage children to explain how their solutions work. With regular practice and room for curiosity, beginners can build the confidence needed to explore more advanced coding projects over time.