Science becomes more engaging when students can test ideas, observe results, and discover how the world works for themselves. Instead of learning scientific concepts only from textbooks, middle school students can explore chemistry, physics, biology, and earth science through simple hands-on experiments.
The best easy science experiments for middle school use accessible materials, provide clear instructions, and encourage students to ask questions. Activities such as testing water filtration, investigating surface tension, building paper bridges, and observing plant growth help learners connect scientific concepts with everyday experiences.
These experiments are suitable for classroom demonstrations, science lessons, supervised home activities, and school science fairs. Each activity offers an opportunity to make a prediction, collect evidence, and explain the results using scientific reasoning.
Why Are Hands-On Science Experiments Important?
Middle school is an important stage for developing scientific thinking. Students begin moving beyond simple observations toward explanations involving variables, evidence, and cause-and-effect relationships.
Hands-on experiments allow students to apply the scientific method in a practical setting. They can ask a question, form a hypothesis, test an idea, record observations, and decide whether the evidence supports their prediction.
These activities can help students develop several essential skills:
- Critical thinking: Students compare predictions with actual results.
- Problem-solving: They investigate unexpected outcomes and consider possible explanations.
- Observation: They record changes in color, temperature, movement, or other measurable features.
- Data analysis: They organize measurements in tables or graphs.
- Collaboration: They share responsibilities and discuss findings with classmates.
Experiments do not need expensive equipment to be educational. Simple materials can produce meaningful learning when students understand the question being investigated and record their results carefully.
1. Investigate Surface Tension With Water and Pepper
This experiment demonstrates surface tension and shows how soap can change the behavior of water at its surface.
Materials needed:
- A shallow plate
- Water
- Ground black pepper
- Liquid dish soap
- A cotton swab
Steps:
- Pour a shallow layer of water into the plate.
- Sprinkle a small amount of pepper evenly across the water’s surface.
- Observe how the pepper is distributed.
- Dip the cotton swab into a small amount of dish soap.
- Gently touch the soapy swab to the center of the water.
- Record what happens to the pepper.
What happens and why?
The pepper usually moves quickly away from the point where the soapy swab touches the water. Water molecules attract one another, creating surface tension. Soap changes the surface properties of water, creating a difference in surface tension that drives the visible movement.
The pepper is carried along by the movement of the water’s surface. It does not mean the pepper itself is repelled by a mysterious force.
Scientific concepts: Surface tension, molecular interactions, and observation.
Extension activity: Repeat the experiment with clean water and compare the results with water containing a small amount of soap. Ask students to explain why the two conditions differ.
2. Build a Paper Bridge and Test Its Strength
A paper bridge demonstrates how shape and structure influence the strength of a material. Students can investigate engineering principles while practicing fair testing.
Materials needed:
- Several sheets of identical paper
- Two stacks of books
- Small coins or identical counters
- A ruler
Steps:
- Place the two stacks of books a short distance apart to create a gap.
- Lay one flat sheet of paper across the gap.
- Add coins one at a time to the center of the paper until it bends too much or can no longer support the load.
- Record the number of coins supported.
- Repeat the test using paper folded into an accordion shape.
- Compare the results, keeping the paper type, gap, and loading method consistent.
What happens and why?
The flat paper may bend under a relatively small load. Folding the paper changes its geometry and increases its resistance to bending in this arrangement. The folded bridge may therefore support more coins.
The result depends on the paper, fold spacing, bridge span, and placement of the load. Students should use repeated trials rather than assuming one test proves which design is always strongest.
Scientific concepts: Forces, structural engineering, and material strength.
Extension activity: Challenge students to design a bridge that supports the greatest number of coins while using only one sheet of paper. Have each group explain the design choices behind its results.
3. Explore Density With Saltwater and Freshwater
Density describes how much mass is contained in a given volume. This experiment helps students investigate how dissolved salt affects water density and how density differences influence floating objects.
Materials needed:
- Two clear glasses
- Water
- Table salt
- A spoon
- Two similar-sized eggs, if available
- A tray to catch spills
Steps:
- Fill both glasses with approximately equal amounts of water.
- Leave the first glass as fresh water.
- Add several spoonfuls of salt to the second glass and stir until the salt dissolves. Add more if necessary.
- Carefully place an egg into each glass.
- Observe whether the eggs sink or float.
- Record the differences and discuss possible explanations.
What happens and why?
An egg may sink in fresh water but float in sufficiently salty water. Dissolved salt increases the water’s density. When the surrounding liquid is dense enough, the upward buoyant force can support the egg.
The exact result depends on the egg’s density and the amount of salt dissolved. Students should not assume that every egg will behave identically.
Scientific concepts: Density, mass, volume, and buoyancy.
Extension activity: Prepare saltwater solutions with different amounts of salt. Compare how much salt is needed before the egg begins to float, using the same egg and water volume where practical.
4. Make a Simple Water Filter
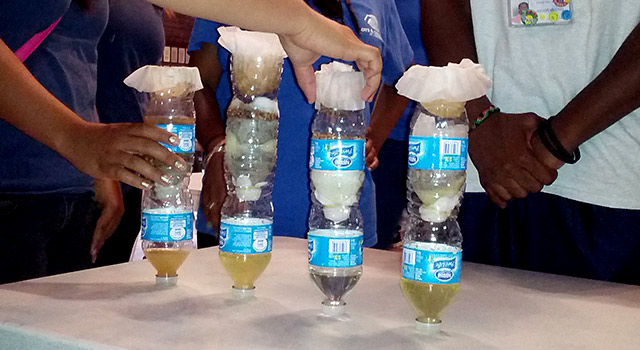
Water filtration is a useful way to explore environmental science and engineering. Students can construct a basic filter and observe how different materials affect the appearance of muddy water.
Materials needed:
- A clean, transparent plastic bottle prepared by an adult
- Coffee filter or clean cotton
- Clean sand
- Small gravel
- Muddy water made from soil and tap water
- A collection container
Steps:
- Ask an adult to prepare the bottle safely by cutting it if necessary.
- Place the filter material near the bottle’s neck.
- Add layers of clean sand and gravel.
- Position the bottle over the collection container.
- Slowly pour the muddy water through the filter.
- Compare the filtered water with the original sample and record visible differences.
What happens and why?
The filter may remove some suspended particles, making the water appear clearer. Different layers trap particles of different sizes, while the filter material helps prevent sand and gravel from escaping into the collection container.
However, clear-looking water is not necessarily safe to drink. This simple filter does not reliably remove harmful microorganisms, dissolved chemicals, or all contaminants.
Scientific concepts: Filtration, particle size, water quality, and environmental engineering.
Extension activity: Compare two filter designs and measure how much visible sediment remains after each trial. Students can also compare filtration speed, while keeping the amount of water consistent.
5. Observe Plant Growth Under Different Conditions
Plants need suitable environmental conditions to grow. This experiment helps students investigate how light affects the growth of young seedlings.
Materials needed:
- Fast-growing seeds, such as bean seeds
- Three small containers
- Potting soil
- Water
- A ruler
- Labels
Steps:
- Fill the three containers with equal amounts of soil.
- Plant the same number of seeds at the same depth in each container.
- Water each container with the same amount of water.
- Place one container in a suitable bright location and the others in different light conditions.
- Keep other conditions as similar as possible.
- Measure the seedlings regularly and record their appearance.
Avoid placing growing plants in conditions that create excessive heat or otherwise damage them. A dark-condition comparison should be brief and supervised.
What happens and why?
Seedlings may grow differently depending on light exposure. Plants use light for photosynthesis, the process by which they convert light energy into chemical energy. Seedlings grown with very little light may become pale and elongated as they respond to the lack of light.
Height alone does not tell the full story. Students should also observe leaf color, stem strength, and overall plant health.
Scientific concepts: Photosynthesis, plant development, and experimental variables.
Extension activity: Have students graph plant height over time. Discuss why a fair test requires consistent soil, seed type, water, and measurement methods.
6. Investigate Chemical Reactions With Baking Soda and Vinegar
A baking soda and vinegar reaction offers a visible introduction to chemical change and gas production. It can help students connect observations with evidence of a reaction.
Materials needed:
- Baking soda
- Vinegar
- A small, open container
- A measuring spoon
- A tray
Steps:
- Place the container on the tray.
- Add a small measured amount of vinegar.
- Add a small amount of baking soda.
- Observe the bubbles and foam that form.
- Record how long the visible bubbling continues.
- Repeat with different measured amounts while keeping the container and other conditions consistent.
What happens and why?
Baking soda reacts with acetic acid in vinegar, producing carbon dioxide gas, water, and a dissolved compound called sodium acetate. The bubbles are evidence of gas formation during the reaction.
Students should avoid sealing the mixture in a rigid container because gas buildup can create pressure.
Scientific concepts: Chemical reactions, acids, bases, and gas production.
Extension activity: Compare the reaction when different amounts of baking soda are used. Ask students to distinguish what they observe from what they infer about the reaction.
7. Test How Insulation Affects Temperature
Insulation slows the transfer of thermal energy between an object and its surroundings. Students can investigate this principle using containers wrapped in different materials.
Materials needed:
- Two or three identical cups
- Warm tap water
- Thermometer
- Materials such as cloth, paper, or bubble wrap
- Timer
Steps:
- Label each cup and leave one unwrapped as a control.
- Wrap the other cups in different insulating materials.
- Pour equal amounts of warm tap water into each cup.
- Measure and record the starting temperature.
- Measure the temperature at regular intervals, such as every five minutes.
- Compare the temperature changes over the same period.
Use warm tap water rather than boiling water, and follow classroom safety procedures for handling it.
What happens and why?
The cups may cool at different rates because the materials affect heat transfer. The best-performing material depends on its properties, thickness, fit, and the conditions of the experiment.
Students should compare temperature changes rather than judging insulation based on how a material feels to the touch.
Scientific concepts: Thermal energy, heat transfer, and insulation.
Extension activity: Graph temperature against time for each cup. Ask students to explain which material slowed cooling most effectively and whether the results were consistent across trials.
8. Create a Simple Static Electricity Experiment
Static electricity demonstrates how electric charges can cause objects to attract one another. This experiment uses an ordinary balloon to produce a visible effect.
Materials needed:
- One balloon
- Small pieces of dry paper
- A wool or synthetic fabric
- A clean, dry surface
Steps:
- Inflate the balloon and tie it securely.
- Cut or tear paper into small pieces.
- Rub the balloon against the fabric for several seconds.
- Bring the balloon close to the paper pieces without touching them.
- Observe whether the pieces move toward the balloon.
- Repeat the experiment after allowing the balloon to sit for a short time.
What happens and why?
Rubbing the balloon against the fabric can transfer electric charge between the materials. The charged balloon can attract nearby paper through the electric forces acting on charges within the paper.
Humidity, material type, and the amount of rubbing can affect the result.
Scientific concepts: Electric charge, electrostatic forces, and attraction.
Extension activity: Compare the balloon’s effect before and after rubbing. Ask students to explain why the attraction changes and why the result may vary in humid conditions.
How to Make Science Experiments More Educational
A successful experiment involves more than following instructions. Students should understand the question being investigated and use evidence to support their explanations.
Teachers can improve learning by following a consistent process.
1. Start with a testable question
A useful question can be investigated through observation or measurement. For example, “Which paper bridge design supports the most coins?” is more testable than “What is the best bridge?”
2. Ask students to make a prediction
Before starting, students should write what they expect to happen and explain why. Predictions help reveal their existing understanding and provide something to compare with the results.
3. Identify variables
Explain which factor is being changed, what outcome is being measured, and which conditions should remain consistent. This is particularly important when comparing materials or testing different amounts of a substance.
4. Record observations
Students can use tables, drawings, photographs, or graphs to document what happens. Encourage them to record actual observations rather than changing results to match their predictions.
5. Discuss unexpected results
An unexpected outcome is an opportunity to investigate possible explanations. Students can check their procedure, repeat the test, or consider whether an uncontrolled variable affected the results.
Science Experiment Safety Tips for Middle School Students
Even simple classroom experiments require appropriate supervision and preparation.
- Follow the teacher’s instructions and use protective equipment when required.
- Never taste experimental materials or drink water used in a laboratory activity.
- Use only small, appropriate quantities of household materials.
- Have an adult handle sharp tools, including bottle-cutting equipment.
- Avoid mixing cleaning products or unknown chemicals.
- Do not seal gas-producing reactions in rigid containers.
- Use warm rather than boiling water for temperature experiments.
- Wash hands and clean the work area after each activity.
Teachers should review allergies, material hazards, and school safety requirements before beginning an experiment. If an activity is not appropriate for the available setting, use a demonstration or choose a safer alternative.
Frequently Asked Questions
What are the easiest science experiments for middle school students?
Simple options include the water-and-pepper surface tension experiment, paper bridge testing, density investigations with saltwater, plant growth observations, and baking soda and vinegar reactions. The best choice depends on the learning objective and available materials.
How can students make a science experiment successful?
Students should begin with a clear question, make a prediction, follow a consistent procedure, record observations, and explain their results using evidence. Repeating trials can help determine whether an outcome is reliable.
Can these experiments be completed at home?
Many can be performed at home with adult supervision and common household materials. Experiments involving cutting tools, warm water, or chemical reactions require additional care and should follow appropriate safety instructions.
Which science experiments are suitable for a school science fair?
Paper bridge strength tests, plant growth comparisons, insulation investigations, and water filtration comparisons can make useful science fair projects. Students should define a testable question, collect data across multiple trials, and explain the limitations of their results.
Conclusion
Easy science experiments give middle school students opportunities to investigate the world through observation, testing, and evidence-based reasoning. From exploring surface tension and density to building paper bridges and examining insulation, these activities introduce important scientific ideas without requiring expensive equipment.
The most valuable part of an experiment is not simply the final result. Students benefit when they make predictions, control variables, collect measurements, and explain why their observations occurred.
By incorporating easy science experiments for middle school into regular lessons, teachers can make science more interactive and help students develop curiosity, critical thinking, and practical problem-solving skills. With clear instructions and appropriate safety precautions, everyday materials can become the starting point for meaningful scientific discovery.
Leave a Reply